Connecting communications and installing a machine are the most popular services of service centers. If you have basic plumbing skills, you can save a couple of thousand and install the device yourself.
The right choice of location

Do-it-yourself connection of the washing machine to the water supply system will not do without the right choice of location and access to the main communications - water supply, electricity, sewerage. To reduce noise to a minimum and ensure safe operation of the machine, it is necessary to find an optimally level and stable place away from heating appliances. Concrete base - the most stable base for the machine. If necessary, the unit can be "adjusted" with the help of rotating legs.
Where will the washing machine fit:
- The bathroom is a classic of the genre and almost perfect. Communications are close, the working area is comfortable, the only inconvenience is the risks associated with high humidity in the room.
- The kitchen is the choice of those who do not have a washing machine in the bathroom.Most often, the machine fits next to the sink or is mounted in a built-in kitchen set.
- The toilet is a solution for the desperate. Narrow and wall-mounted washing machines are the best option that can save space.The main feature - the supply of communications requires sophisticated methods and the selection of tools for each individual case.
- The living room is most often a hidden option like a “washer in the closet”. For this room, a separate pipe connection is almost always required.
Ways to tie into the water supply

First of all, the methods differ depending on which pipes are used: metal, metal-plastic or plastic. So, if you have the first option, then it is most convenient to use a “vampire” clamp, in the second case - a tee-fitting, and in the latter, for a good connection, you will have to solder a tee into the pipe.
Connection to a metal pipe
To tie into a metal pipeline, you will need a mortise clamp. When mounted, the device plays the role of a tee and provides water supply to the washing machine. The tightness of the connection is ensured by the elastic band that comes with the clamp.
Choosing a place for the clamp
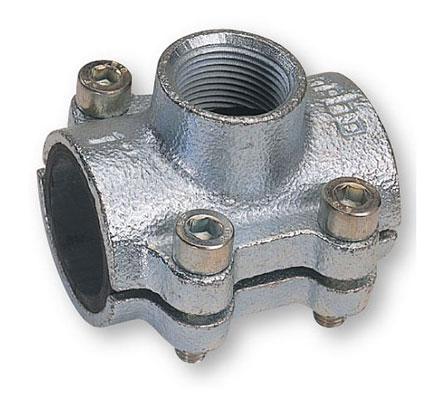
The choice of location for the device depends on the reliability of the connection to the pipeline, as well as the convenience of its installation.
- It is better to install the clamp on the pipe section, which is located after the coupling.
- Choose the most even section of the pipe so that the clamp fits snugly against it.
Mounting the clamp

- The first step is to clean off rust, paint or other deposits from the pipe on which the clamp is installed. This can be done with a file, sandpaper or a regular knife.
- The guide sleeve must be inserted into the clamp with the long end inward, tightly fixed in the gasket hole. This way you will ensure immobility of the gasket and it will not move during the installation of the clamp.
- After these preparatory manipulations, attach both parts of the device to the pipeline, and then screw on all the bolts (there are four of them).
- While holding the clamp, tighten the bolts.
While tightening the bolts, the bushing guide will be pushed out on its own. When it comes out completely, the gasket will fit snugly against the pipe.
After finishing work, it is necessary to check how correctly the device was installed. To do this, look through the hole in the clamp at the gasket. If it has a round hole, then the clamp is clamped evenly. If not, tighten or loosen the bolts.
Making way for the water

Before starting work, do not forget to turn off the water, only after that you can start drilling a hole in the pipe:
- Take the guide bushing and insert it into the clamp with the head inside.
- Install a drill with a diameter of 6-7 mm on the drill.
- Substitute a bowl or other container under the clamp (after drilling, water will pour out of the hole).
- Drill a hole.
- Open the nearest faucet powered by this pipe.
- Remove the remaining chips from the clamp with a rag or bandage. Toilet paper works well for this too. This completes the tie-in to the pipeline, now you can connect a tap, pipe or hose to the clamp.
Connection to a metal-plastic pipe

The scheme for connecting a washing machine to a metal-plastic water supply system is different from the previous one, it is simpler, and instead of a clamp, you will need a tee. For work, you will need an adjustable wrench and a calibrator.
Progress:
- Measure the installation length of the tee.
- Find a flat section of the pipe, measure the installation length on it, cut off the resulting piece.
- Put nuts on both halves of the pipe, since it will be very difficult to do this after expanding the holes with a calibrator.
- Expand the ends of the pipe with a calibrator so that the tee fittings are inserted into it.
- Then put on the tightening ring and insert the fitting all the way into the pipe.
- Tighten both nuts alternately, while holding the tee so that it does not scroll.
This completes the installation of the tee. We recommend additionally installing a tap after the tee.
Cutting into a plastic pipe

Perhaps connecting to a plastic pipe is the most difficult, as it requires a soldering station and skills to work with it.
If you have a soldering station, then there will be no problems installing a tee. It is necessary to cut off an extra piece of pipe, having previously measured the installation length of the tee, and then insert the tee and solder the structure.
Is a crane needed?
The answer is obvious - a tap is needed to connect the washing machine to the water supply. The machine can break down and then you have to take it in for repair.And if there is no tap, then you will have to turn off the water completely. And repairs can take more than one day. Now sit without water or clog the pipe hole tightly?
Where to install the crane?
The closer the valve is to the tee, the better. In case of violation of the tightness of the pipe or the connection of the hose to the pipe, you can always block this particular section. In extreme cases, a tap can be installed in front of the inlet hose. The latter tends to fail quickly, especially if the machine often moves from place to place.
Which crane is better to choose?

Don't buy cheap valves. They do not last long, and replacing such an element is quite difficult. You can use both conventional walk-through models and corner ones. It all depends on where it will be installed. Get a faucet that will be convenient to use later. Experts recommend installing angle taps after tees, although the usual ball is quite suitable.In order not to spoil the appearance of the room, you can buy a decorative corner model made of stainless steel.
Crane installation
For installation, you will need a FUM tape and a gas key. A thread is required at the end of the pipe. It is present on tees, so it is easiest to install the valve on them.
Installation process:
- wind the FUM tape on the external thread;
- turn the faucet first by hand;
- tighten it with an adjustable wrench.
Inlet hose connection

Basic rules for a simple and successful installation:
- the length of the hose should not exceed 3 meters;
- it is better to install a crane in front of it;
- FUM tape must be wound on the connection with the pipe for better sealing.
First of all, screw the hose to the washing machine. You can do it by hand without tools.. After that, screw the hose nut onto the pipe or faucet by hand.
Test run

After all the above manipulations, turn on the device and run the trial program. The machine should draw water without problems, start washing and drain. Check the system for leaks and start using.