Repairing automatic washing machines can be a big hit on the wallet - some types of repairs are extremely expensive. In this regard, many people tend to repair their equipment on their own, without resorting to the help of craftsmen. Most malfunctions are easily fixed at home and do not require the use of special equipment. The exception is electronic components, the repair of which requires special tools and knowledge. But each user can change the gum on the washing machine.
As part of this review, we will take a closer look at the process of replacing an elastic band (cuff) on a washing machine and find out what we need for this. We assure you that there is nothing complicated here, and the replacement itself will take a maximum of 20-30 minutes and save a lot of money.
Causes of damage to the hatch cuff

To begin with, it is necessary to define the main causes of damage to the cuff loading hatch. The damage itself is most often cracks and gaps through which water flows. That is, if we see smudges under the loading hatch, we should carefully examine the rubber cuff for malfunctions.
The reasons can be very different. One of these reasons is normal wear and tear. Linen and the drum constantly rub against the cuff, it experiences heating and cooling from water, and is exposed to washing powder. All this leads to the fact that the rubber becomes brittle and brittle, as if it had been in severe frost. Besides washing machine life not eternal and its increase requires the replacement of some parts.
Another reason lies in using bad detergent, which begins to destroy the rubber structure. In this regard, you should not buy cheap washing powders and liquid detergents of dubious quality. It is best not to save money and buy good products that are gentle on fabrics and rubber. By the way, overuse of washing powder can lead to similar consequences - dose it more carefully and remember that an overabundance harms not only individual parts of the equipment, but also your health.
The most common cause of cuff damage is the cutting and pressing effect of nails, screws, plastic parts and metal elements of clothing. Be sure to inspect the pockets of clothing and do not allow metal, plastic and other objects to get into the drum, for this use special laundry bags in the washing machine. You should also familiarize yourself with the rules for washing in automatic machines - locks and other accessories should turn inside out. If you decide to replace the manger because of the fungus, then you should not do this, because there is great way to get rid of mold in the washing machine.
How to remove the cuff on the washing machine
Before proceeding with repair work, it is necessary to determine which cuff is on the washing machine.And here you need to give one simple advice - do not buy cuffs from other models of machines that are similar in appearance to functionality and appearance, as they may not fit. Specify the model name to the seller, and choose an elastic band that will 100% fit your car.
Replacing the cuff of the hatch of the washing machine begins with the time-consuming process of removing it. But before that, you need to make sure that the purchased cuff is completely identical to the damaged cuff. To carry out repairs, we need:
- One or two flathead screwdrivers;
- round nose pliers;
- soap solution;
- Marker.
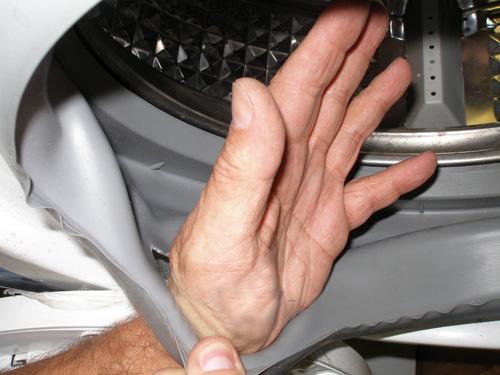
The cuff removal process involves the removal of two clamps, with which it is attached to the tank body and to the front wall of the washing machine. After bending the front edge, it is necessary to loosen and remove the first clamp. If it is made of plastic, then it will be fastened with latches. Metal clamps are tensioned with a spring or with a screw - in both cases, a flat screwdriver is required to remove. We pull the spring with a screwdriver and loosen it, unscrew the screw, and simply pull the plastic clamp towards ourselves. After that, remove the clamps, prying them with the same screwdriver.

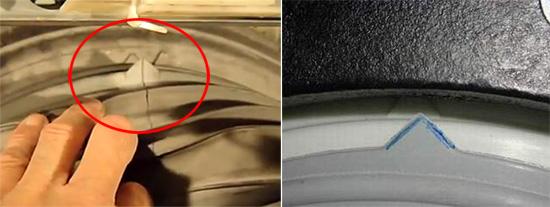
Having coped with the removal of the first clamp, it is necessary to carefully remove front cuff, which is held by its own tension and its special shape. The next task in turn is to fix the position of the cuff using the mark located in its upper part.

The response label is located on the tank itself. When installing a new cuff, these marks will need to be aligned. If there is no response label, draw it with a marker.
Next, we remove the second clamp - the process may seem more complicated than it seems at first glance. In some cases, it will be necessary to remove the top cover altogether in order to figure out where the clamp is and how to remove it. If you can’t get close to the clamp, then remove the front wall of the washing machine.
As in the case of the first clamp, here we need a screwdriver - we release the clamp by unscrewing the bolt or simply drop it by prying it with a screwdriver.

After that, we remove the cuff and prepare for the installation of a new cuff.
How to install the cuff of the hatch of the washing machine

At this stage, you need to compare the old and new cuffs - they should be identical.Otherwise, you will have to go to the store and demand a replacement. Next we need put a cuff on the washing machine - we need endurance, patience and improvised tools.
First you need to clean the edge of the tank from the accumulated dirt - the remnants of powder, salt and much more settle here. We also need a clean surface. We clean with a warm soapy solution until all contaminants are completely removed. We do not erase the remaining soap film - it will help when installing the cuff, serving as a kind of lubricant.
Our next step is to install the cuff in a regular place, on the tank. Since the rubber is new, it will desperately resist.In order to make things go faster, we apply the upper part of the cuff to the upper edge of the tank (do not forget to make sure the marks match), after which we pull the cuff over the edge with two thumbs. That is, the fingers slide along the rubber from the center around the circumference, one to the right and the other to the left. This approach will help prevent the cuff from slipping off at the last stage (at the bottom), when it is stretched and becomes less pliable (a slippery soap solution will help us here). With an effort, it is necessary to put the cuff on the edge completely, after which it will no longer come off.
At the next stage check the correct installation of the cuff - it should fit snugly and without gaps. Otherwise, we will be waiting for leaks. After checking, we proceed to tighten the inner clamp.
If the inner clamp has a spring tension, then we need a screwdriver, which we thread into the hatch blocking hole (if the front wall has not been removed). We put the spring part on the screwdriver. This is necessary so that the spring can stretch freely, allowing us to put the clamp on the seat. If it is pressed against the rubber, it will become less pliable.

If a clamp with a tension screw is used in the washing machine, then the task will be simple - we unscrew the screw, put the clamp on the seat, tighten the screw to the desired force. Plastic clamps with latches are even easier to put on. Once the inner clamp is fixed, the elastic will need to be put on the edge of the front wall and also fixed with a clamp.
If your washing machine uses wire ties without tensioners, use round nose pliers to carefully tighten the metal ends.In the future, the knot must be removed into a special recess on the cuff.
Now we know how to change the cuff on the washing machine, but we need to check the tightness of the gum - turn on some short program, wait for the end or interrupt, and then inspect the bottom of the cuff for leaks (both outside and inside).
