When a serious breakdown occurs in the washing machine: whether it is wear on the bearings or wear on the shaft of the cross on the tank, then disassembly of the washing machine is required, which, of course, is not an easy task. To do this, you can call the master or independently disassemble your washer.
In this manual, you will learn how to disassemble an Indesit, Samsung, LG, Bosh washing machine or another brand of washing machine, because they are all similar in design and principle of operation. In the instructions, you can see slight differences with your model, but they are all quite minor and do not affect the principle of the disassembly process itself. Well, let's get down to business!
To begin with, we need to prepare all the necessary tools, without which it is simply not possible to work.
We prepare the necessary tool
In order to disassemble the washing machine, we need the following tools:
- Slotted and Phillips screwdriver
- Pliers
- A hammer
- A set of keys (open-end and preferably heads)
It is best to prepare this tool in advance so as not to run after it later and not be distracted from the disassembly process. Also, to make the reassembly process faster, you can take pictures or video of the entire disassembly process.
Washing machine disassembly diagram
Before you start work, it would not hurt to familiarize yourself with the general scheme for disassembling a Samsung, LG, Bosh, Indesit washing machine or whatever you have there.This will give you a general idea of what we will be doing and will allow you to complete all the work more quickly.
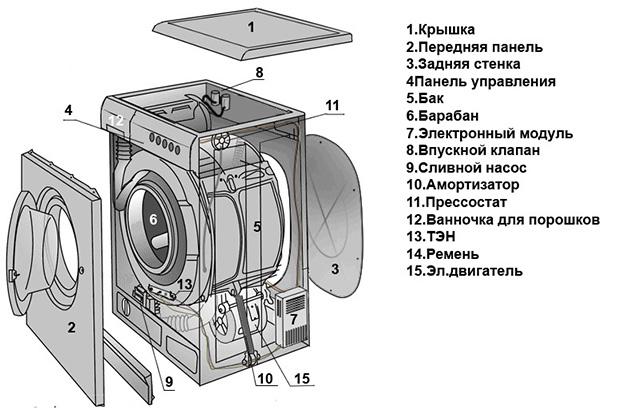
As you can see, there are a lot of details, and in order to remove them all, we need to consider the entire process of disassembling the washing machine step by step. Let's get on with this now.
Dismantling the washing machine
First you need to remove the top cover your washer.
It is removed very simply and every washing machine is the same. Unscrew the two screws on the back of the unit that hold the cover. Next, push the lid away from you. After she moves, she can be removed.
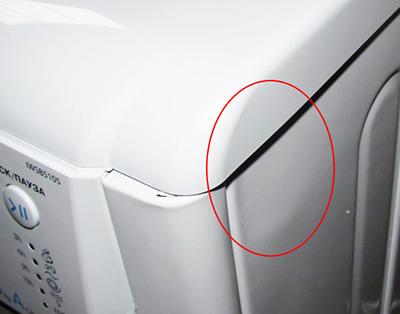
Next best immediately remove bottom panel washing machine, it is fastened with latches and is very easy to remove: you just need to pull it towards you and, if it does not give in, then bend the latches with a screwdriver.
After that you can remove top control panel. It is mounted on several self-tapping screws, which are located under the powder tray, as well as on the other side of the panel. Therefore, to begin with, pull out this very tray by pressing the plastic button in it and put it aside so that it does not interfere with us. Next, unscrew the screws that hold the control panel and pull it towards you, it should move away from the washing machine.
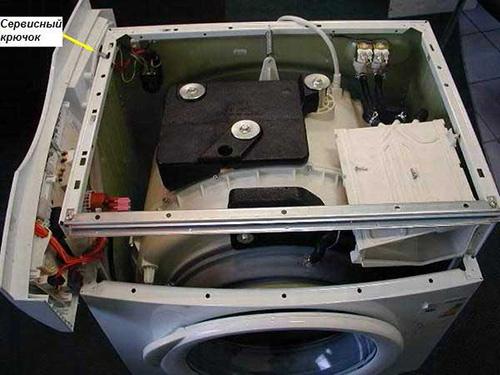
You can leave the panel hanging on the wires or carefully place it on top of the washing machine, or you can disconnect all the wires so that they do not interfere with us. To do this, it is best to mark them with a marker or take a picture so as not to confuse them during assembly.
It also happens that a special service hook is made in cars, for which the dashboard is suspended during repairs.
We will assume that we removed the top panel. Now to us need to remove the front wall washing machine with a hatch for loading laundry. To do this, you first need detach cuffso that it does not hold the panel.
Locate the place on the cuff where the collar that secures it connects.This is usually a small spring that you can even feel for. Tuck this same spring and pull the clamp, it should come off. The cuff can now be tucked in. To do this, remove the elastic band from the front wall with your hands and tuck it inward.
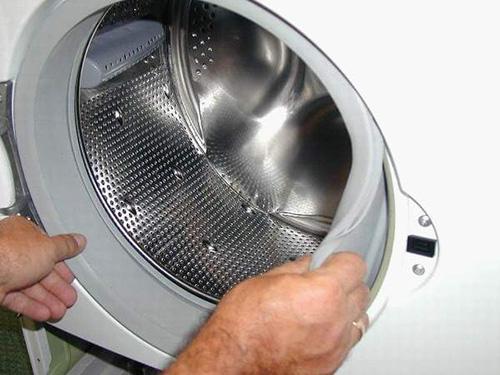
Unscrew the screws holding the front panel with the door. They are at the top under the top control panel and also at the bottom under the bottom panel, which we have already removed. Usually no more than 4 screws. The front panel rests on small special hooks and by lifting it up a little, it can be easily removed. But be careful: the lock for closing the hatch is connected by a wire and therefore, in order to remove the panel, we will have to disconnect it. Luckily, this is pretty easy to do.
Also, as an option, you can unscrew the lock immediately, before removing the front wall, and then it will remain hanging on the wire. But this option seems to us the least convenient.
Now you can remove the back wall at your machine, for this you just need to unscrew the screws on the back wall that secure it.
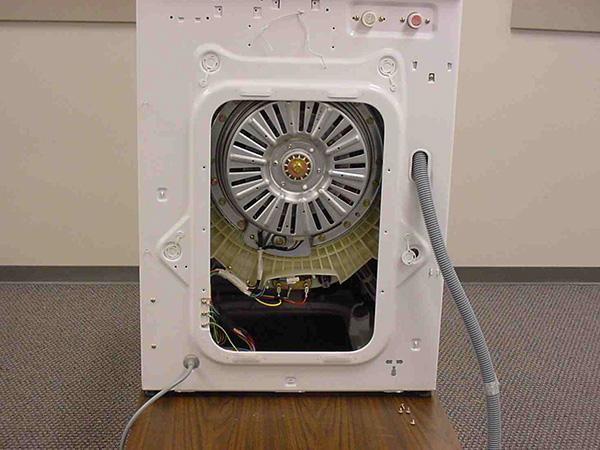
Next, you need to disconnect everything from the drum that prevents it from being removed. For this disconnect the pressure switch hose, then the hose coming from the powder receiver, the inlet hose and the drain pipe. In a word, all the hoses that are connected to the tank of the washing machine.In order to disconnect them, you will first need to unscrew the clamps with a screwdriver.
Now you need disconnect the wires from the heating element. We just unscrew them, having previously photographed them, so as not to confuse them later. The electric heater is located at the bottom of the tank on the front or rear side. You can not disconnect the wires from the heating element if you remove it entirely by unscrewing the nut and pulling it out. How to do this is detailed in heater replacement instructions.
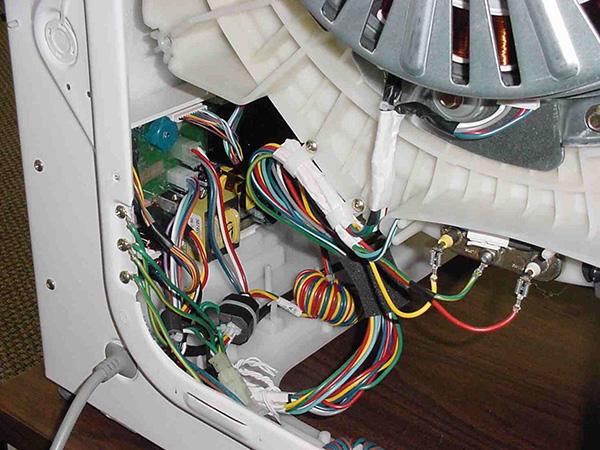
Disconnect the wires from the engine, after taking a photo for memory.
Also, the entire electrical wiring of the washing machine can be attached to the tank with the help of ties, so it is best to unfasten it and put it aside so that it does not interfere with us in the future.
If we remove the tank, and we certainly will do it, then it would not hurt us to lighten its weight. For this unscrew counterweights, which are located on the top and bottom of the tank and remove them away.
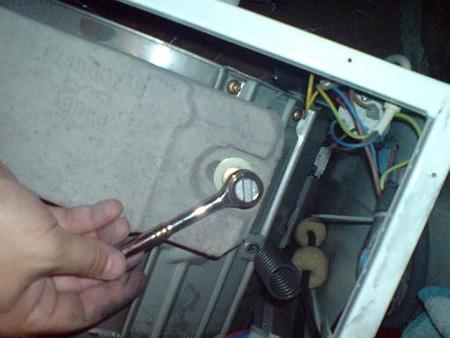
In principle, the tank is already ready to be pulled out, because we only have unscrew shock absorbersholding it, and remove the tank from the springs. Let's do it. Take a wrench, or better a wrench, and unscrew the bottom bolts that secure the shock absorbers to the body of the washing machine. Get them out.
Now carefully remove the tank from the springs and pull it out.
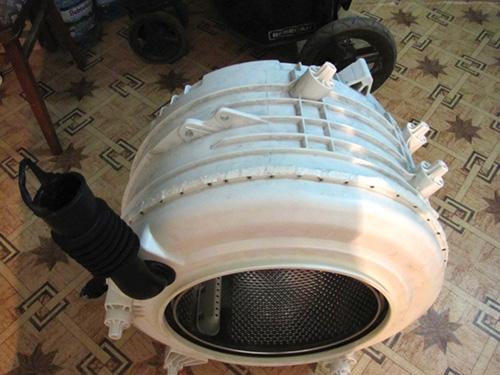
As you understand, we removed the tank along with the engine without removing the engine itself, so now is the time to unscrew it. But first, remove the belt, then twist the engine and shock absorbers.
Farther unbolt the engine and you can start disassembling the tank of the washing machine. By the way, you can use the engine as an emery. For this it is necessary connect the motor according to a certain scheme.
The tank is disassembled in the same way as with replacing bearings in a washing machine. Therefore, if you are going to disassemble the tank and change the bearings, then read a separate article on this issue.
In theory, we disassembled the washing machine piece by piece, and now you can get to any part of it and replace it, and then proceed with the reassembly.
Washing machine assembly
It is not difficult to guess that you need to assemble the washing machine in exactly the opposite order of its disassembly without any tricks. Therefore, we take out a camera or phone on which there are photographs taken by you during the disassembly of the unit, and return all the details of the machine to their original state.
Also, you can just read this article from bottom to top to assemble a washing machine.
If you have any questions about disassembling or assembling the washing machine, ask them in the comments.
Don't forget to watch the video, which shows the whole process of how a professional dismantles an Indesit washing machine with a glued tank.

Comments
Thanks a lot, your advice helped me a lot
How to put a spring on an elastic band
Thanks a lot. Helped a lot.
after replacing the bearing, the machine stopped working normally, the lock indicator and the dirty laundry indicator began to flash quickly. Tell me what happened before replacing the bearing everything was fine.
Good day, I have such a question, I had a Samsung machine and from it there was a panel with a board and all the locks and wires, now I have purchased a LG machine, but it has few functions, so how can I create a panel from a Samsung and with its functions on a new machine is it possible at all, as it seems to me, they are all assembled the same current, the functions are different