Washing machines, like any other type of equipment, eventually become obsolete and fail. Of course we can go anywhere clean up an old washing machineor dismantled for parts. If you went the last way, then you could have left the engine from the washing machine, which can serve you well.
The motor from an old washing machine can be adapted in the garage and built from it to an electric emery. To do this, you need to attach an emery stone to the motor shaft, which will rotate. And you can sharpen various objects about it, starting with knives, ending with axes and shovels. Agree, the thing is quite necessary in the economy. Also, other devices that require rotation can be built from the engine, for example, an industrial mixer or something else.
Wiring diagram of the electric motor of a modern washing machine
If you have figured out what to do with the old motor, then the first question that may bother you is how to connect the electric motor from the washing machine to the 220 V network. And just to this question we will help you find the answer in this manual.
Before proceeding directly to connecting the motor, you must first familiarize yourself with the electrical diagram, which will make everything clear.
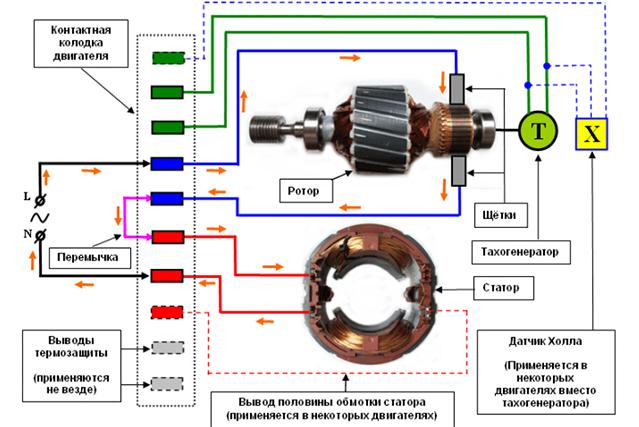
Connecting the motor from the washing machine to the 220 volt network should not take you much time.To get started, look at the wires that come from the engine, at first it may seem that there are a lot of them, but in fact, if you look at the above diagram, we don’t need all of them. Specifically, we are only interested in the wires of the rotor and stator.
Dealing with wires
If you look at the block with wires from the front, then usually the first two left wires are wires tachometer, through them the engine speed of the washing machine is regulated. We don't need them. In the image they are white and crossed out with an orange cross.
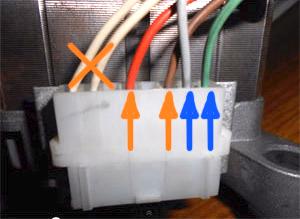
Next comes the stator wires red and brown. We marked them with red arrows to make it clearer. Following them are two wires to the rotor brushes - gray and green, which are marked with blue arrows. We will need all the wires indicated by the arrows for connection.
In different models of washing machines, the wires will differ in colors, but the connection principle remains the same. You just need to find the necessary wires by ringing them with a multimeter.
To do this, switch the multimeter to measure resistance. Touch the first wire with one probe, and look for its pair with the second.
A working tachogenerator in a quiet state usually has a resistance of 70 ohms. You will find these wires immediately and put them aside.
Just ring the rest of the wires and find pairs for them.
We connect the engine from the washing machine
After we found the wires we needed, it remains to connect them. To do this, we do the following.
According to the diagram, one end of the stator winding must be connected to the rotor brush. To do this, it is most convenient to make a jumper and insulate it.
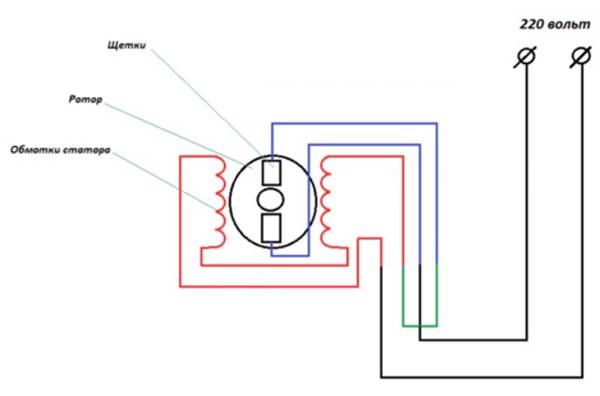
The jumper is highlighted in green in the image.
After that, we have two wires left: one end of the rotor winding and a wire going to the brush. They are what we need.These two ends are connected to a 220 V network.
If you want to change the rotation of the motor in the other direction, then you just need to throw a jumper to other contacts, swap the wires of the rotor brushes. See the diagram for what it looks like.
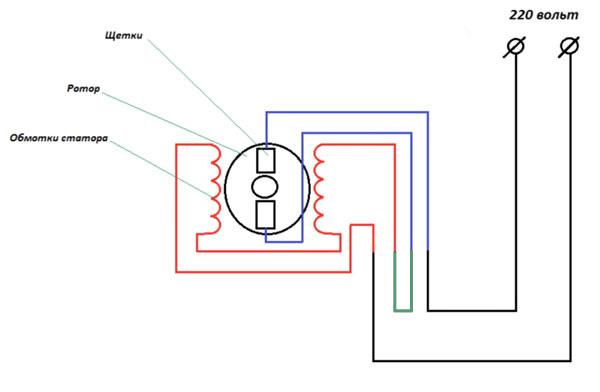
If you did everything right, the motor will start to rotate. If this did not happen, then check the engine for operation and then draw your own conclusions.
Connecting the motor of a modern washing machine is quite simple, which cannot be said about old machines. Here the scheme is slightly different.
Connecting the motor of an old washing machine
Connecting the motor of an old washer is a little more complicated and will require you to find the right windings yourself with a multimeter. To find the wires, ring the motor windings and find a pair.
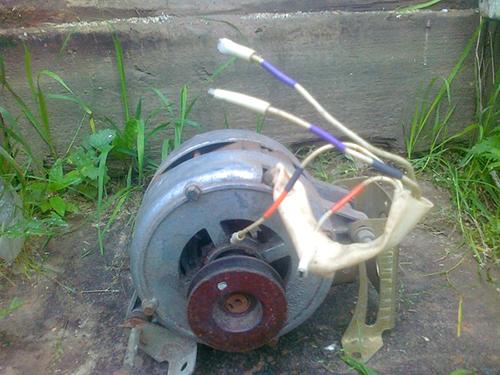
To do this, switch the multimeter to measure resistance, touch the first wire with one end, and find its pair with the second in turn. Write down or remember the resistance of the winding - we will need it.
Then, similarly, find the second pair of wires and fix the resistance. We got two windings with different resistance. Now you need to determine which one is working and which is launcher. Everything is simple here, the resistance of the working winding should be less than that of the starting one.
To start an engine of this kind, you will need a button or a start relay. A button is needed with a non-fixable contact and, for example, a button from a doorbell will do.
Now we connect the engine and the button according to the scheme: But the excitation winding (OV) is directly supplied with 220 V. The same voltage must be applied to the starting winding (PO), only to start the engine for a short time, and turn it off - this is what the button is for ( SB).
We connect the OB directly to the 220V network, and connect the software to the 220V network through the SB button.
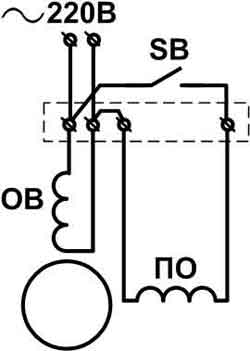
- ON - starting winding. It is intended only for starting the engine and is activated at the very beginning, until the engine starts to rotate.
- OV - excitation winding. This is a working winding that is constantly in operation, and it rotates the engine all the time.
- SB - a button with which voltage is applied to the starting winding and, after starting the motor, turns it off.
After you have made all the connections, it is enough to start the engine from the washing machine. To do this, press the SB button and, as soon as the engine starts to rotate, release it.
In order to reverse (motor rotation in the opposite direction), you need to swap the contacts of the software winding. This will cause the motor to rotate in the opposite direction.
Everything, now the motor from the old washer can serve you as a new device.

Comments
The engine is from an old little washer "Fairy". Same as in the video. I connected it, as shown in the video - only the working winding, it turns, but it heats up, after 5 minutes you can’t touch it. How to proceed?
thanks for the info
In the Wisl 105 washing machine, it is not possible to turn off the indicator (behind the lock pattern), it constantly flashes. How can it be turned off? The red oval light is constantly flashing.
How to connect the engine so that it works in washing mode.
Good afternoon! Please tell me how many revolutions the engine has from the old machine, this is the last picture. I have exactly the same, with an output of 4 wires.
Thanks a lot. Precisely available step by step bravo!
I know how to connect the engine from the washing machine to the output of 3 wires, how to connect it to 220v
if you connect a capacitor instead of a button, then the engine starts without pressing, the start characteristic is selected by the capacitance of the capacitor, 1 microfarad is enough for the washer.
Please help connect the motor from the washing machine SMP-3 Eureka with four outputs
The author is far from the basics of email. technology. The capacitor is not needed for a soft start, but to create a circular magnetic field. It is from the correct choice of capacitor that the efficiency of the engine depends.
And how to connect the engine as in the last photo through the starting relay, and you can connect a 3-pin toggle switch to it for reverse
Not for every old motor there is such a connection. The working winding in the diagram has the beginning of the winding and the end. If it is turned on incorrectly, the engine will heat up and fail. A capacitor is needed.
good afternoon.
Zanussi washing machine, quite old.
There are 8 wires on the block. 2 white-determined, this is a tachometer. then go (go inside the engine) two black, green and brown. and on brushes red and blue.
as I understand it, we recline the white ones, everything is clear with the brushes too. But how to determine which pair to take more? cause resistance?
I bought an old-style washing machine PM-2 Dombas-3 from a local drunk, took everything apart carefully, but it turned out that the contacts were disconnected from the thing that you turn and it ticks (I apologize for the explanation, I don’t know how to explain it in another way) 3 contacts come out of the engine and on this little thing has 7 contacts (dad), and in total with those that go directly from the power plug, it turns out 6 contacts (mother), help me figure it out. If I can take a photo, just tell me where to post it.
There are dv from the machine 180 watts. A 4 microfarad capacitor was connected. Doesn't pull. What could be?
There is an engine from the washing machine Siberia-3 1962. All the diagrams, on the plates, are half-erased. Power is 250 watts, revolutions are 1480. A 30 microfarad capacitor is written.
Good evening. I have an ABE-071-4C motor with three wires. when I connect two of the three directly, it spins but slowly. Tried all three connection options. The speed is small. Tell me what's the problem
A good article, but it would not hurt the author to indicate that the emery wheel must be balanced when installed on the motor shaft, and sharpening various cutting tools requires some skills. Although, the above is beyond the scope of the article, so my comments may be worthless. Sorry.
thanks, all worked well
How to remove a pulley from an electric motor of a modern machine?
That is, if the auxiliary winding of a single-phase motor is starting, it will only be connected during the start-up, and if the auxiliary winding is capacitor, then it will be connected through a capacitor that remains on during engine operation.
How can I reduce the rpm it spins too fast
If my memory serves me, 60 microfarads per 1 sq. Selection of capacitors for the motor.On a small engine, instead of a capacitor, you can connect a light bulb
Good day!!! And how can I manually adjust the engine speed from the Indesit machine? If you connect the machine directly to 220 V?
Simplicity is the trump card of science!
I will make a twister for the potter for the children
there is an engine from Elenberg 3620 - there are 5 outputs and I don’t understand which one goes where! Tell me the connection diagram for 220 V.
emery at 12000 rpm. How do you control rpm without losing power?
There is a tipo m12.06.46.48 engine from an old indesit washing machine. How to connect it - according to the first scheme or the second?
Thank you. The engine from the Candy automatic machine was connected. Made sandpaper for spinners. Everything is simple and clear. Thanks again.
Please give comments on connecting the engine NUOVA IBMEI TIPO MCA 62.55/BY52
A rpm Hp Tach. mV/9
2 650 0,09 1,1
12000 0,20
its power, how to adjust the speed. The electronics is not strong. Thank you.
Hello, please tell me how to connect the engine from ARDO TL105S? On the terminal block there are two wires for the brushes, two for the tacho sensor, three light brown wires and one black wire.
Tell me please! I have a semi-automatic machine, the engine on the washing drum burned out on it! I decided to put the engine from the old Volga typewriter. But the burned-out engine has three wires, and that one has four! Can you tell me how to connect?
Hi, one of these wires is common, and the rest are the working and starting windings, if you have a multimeter, ring in different variations until you find both windings, the starting one has more resistance, connect it through a capacitor, say the found common one for one contact, the wire from the working and in parallel with it, a wire from the starting one is already connected through the conder. ?
motor from the old washing machine "Vyatka". has 6 outputs, should it be treated like with engines from modern cars, or are there any features so that it does not burn out during operation? I will be grateful if someone takes the time.
All this is fine - multimer, etc.
And how to determine what to connect where, if there are no these “measures” and you don’t know how to use them?
the control unit failed - switched to manual by installing 4 toggle switches: filling, washing, spinning through the lator with the possibility of reverse, heating and draining.from each toggle switch, the connection is direct. I washed it all summer in the country, it’s normal and even interesting. Yes, I also turned off the hatch blocker, and I measured the temperature indirectly by measuring the resistance of the thermistor of the machine, if anyone is interested, write to the mail
AUTOMATIC DOES NOT WORK ON THE AWV-1000 VIRPUL WASHING MACHINE I WANT TO CHANGE TO HAND WASHING PLEASE TELL HOW TO REDUCE THE ENGINE RPM AND THE CONNECTION SCHEME. I WILL BE VERY GRATEFUL TO YOU. VALELERY.
There is an engine from the CONSTRUCTA automatic machine, the Siemens engine itself, the problem is that eight wires come out of it and all of the same color, having disassembled it, I saw wire marks: UB +, GND, AUT, A1, A2, D1, D2, Tell me how to connect it directly, two weeks already ****, the head swells.
Hello. \ the working resistance should be less\ there is no error ?? Thanks.
A very useful article. I read it, connected it - it works. Thanks