Buying the right built-in appliances means saving

Modern kitchens have a number of additional requirements. So, this type of room, in addition to excellent design, should be distinguished by functionality and economical energy consumption.

Today, the kitchen is used not only for cooking, but also as a dining room, which is why all the appliances that are located here must also be ergonomic.

Professional designers advise modern consumers to buy built-in appliances. It will allow you to create a stylish, modern and cozy design in the kitchen, at the same time it meets all the technical requirements presented today. The latter include energy savings and ergonomics.


How to choose and buy embedded appliances wisely?

In order for built-in appliances to serve for more than a dozen years, its purchase does not lead to additional waste, but helps to save money, consumers need to pay attention to the following series of recommendations from experts.

You can buy built-in appliances at any time by contacting hardware stores Tashkent. Fortunately, modern stores offer a huge assortment of it.But it is better to do this even at the stage of creating a design project for your kitchen. Otherwise, events will develop according to two scenarios that are unpleasant for the buyer. The first is when the purchased goods in size slightly do not match the furniture in the kitchen. Then you have to return the purchase back to the store and choose new devices. And this leads to additional cash costs for the delivery / export of unsuitable goods. Secondly, if it is not possible to return the purchased equipment back to the store, you will have to completely redo the kitchen project. It also doesn't come cheap.

It is better to buy built-in appliances at large points of sale, where each product is accompanied by a quality certificate.It guarantees that the technical characteristics of the equipment correspond to the declared parameters. In addition, these stores provide a guarantee and offer home delivery. Even if the product is damaged in transit, the store is obliged to replace it with a new one without physical damage.

Any type of branded, built-in equipment is equipped with an instruction manual, one of the sections of which is a detailed description of the installation scheme of a particular type of device. With the help of this manual, you can install the equipment yourself. However, as practice shows, it is better to entrust all this to specialists in their field. Firstly, the installation wizard has the appropriate experience, easily navigates the intricacies of installing built-in appliances from various manufacturers. Secondly, a properly installed device will last an order of magnitude longer.

Do not forget that in today's market there are built-in appliances from various manufacturers.If the oven and hob will always be in sight, they are bought in the same style, color and model, then the rest of the appliances will be covered with cabinet furniture, and therefore they can not be bought necessarily of the same brand. Here you can choose the product that best suits your taste preferences and wallet size.

Properly chosen equipment will delight its owner with uninterrupted operation for more than a dozen years. Buy only certified.

Ventilation of the house is a prerequisite in construction. Without good ventilation, the room will be damp and the air will not circulate. Such problems will lead not only to discomfort during living, but will also affect safety in general. The ventilation system should be suitable for the size of the house and the number of closed rooms, and if this is not enough, you can install a floor fan. In the article we will talk about which fan to choose, what types there are and analyze the rating of the best models.

quietest floor fans for home

How to choose a fan for the house

Today, household appliance stores have a large selection of fans for the home, which have differences in parameters.

How to promote a new YouTube channel quite relevant topic in our time. Read the article and find out how to do it.

Here are the options to look at:

  • motor unit;
  • installation features, whether additional devices are needed and how long it will take to install;
  • operating power, the amount of blown air;
  • the presence or absence of noise;
  • mechanical or electrical control;
  • fan size and shape;
  • optional resources.

which fans are best

It will depend on the power of the model at what speed the air will circulate in the apartment, but square meters of the room must be taken into account. If the room is small, then it makes no sense to buy a unit that is too powerful and set it to low speed. We buy one for the whole apartment andfloor fans for home reviews use by the whole family. There are floor fans that fold easily and are convenient to take with you out of town or to another room.

quiet floor fan for home

If the family is large, then on hot summer days a fan is required in each room and then you need to buy several devices, for example, one powerful and two medium ones. In this state of affairs, no one will be left without a portion of cool air in the sweltering heat.

Types of household fans

which fan to buy for the house outdoor is better

Air conditioning is certainly good, a powerful installation that can cool the air well to a comfortable temperature in summer - 22-25 degrees and make it warm in winter - 24-26 degrees. But along with the advantage, there are also disadvantages. Not every family can afford to install an air conditioner.

home fans reviews

The average cost of "such a pleasure" starts at 12 thousand, plus installation fees and annual maintenance. Floor fans are another matter; for a home, you can buy the simplest model for 1500-2000 thousand.

Not useful in winter, but in summer it can freshen the air. In addition, you can put it next to an open window and, in addition to cooling, fresh air will enter the apartment.

Main characteristics and selection criteria

Fans vary in several ways that affect performance and cost.

fan device

working mechanism

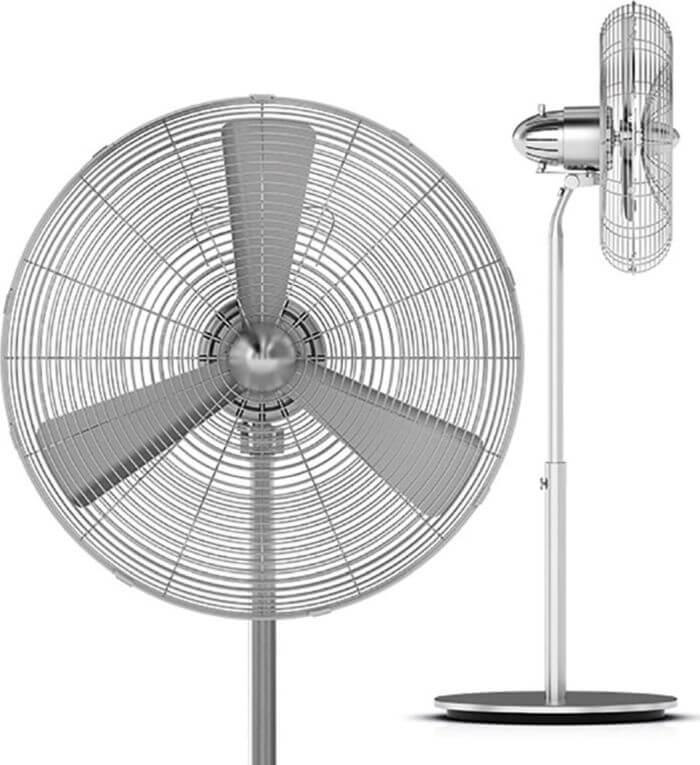
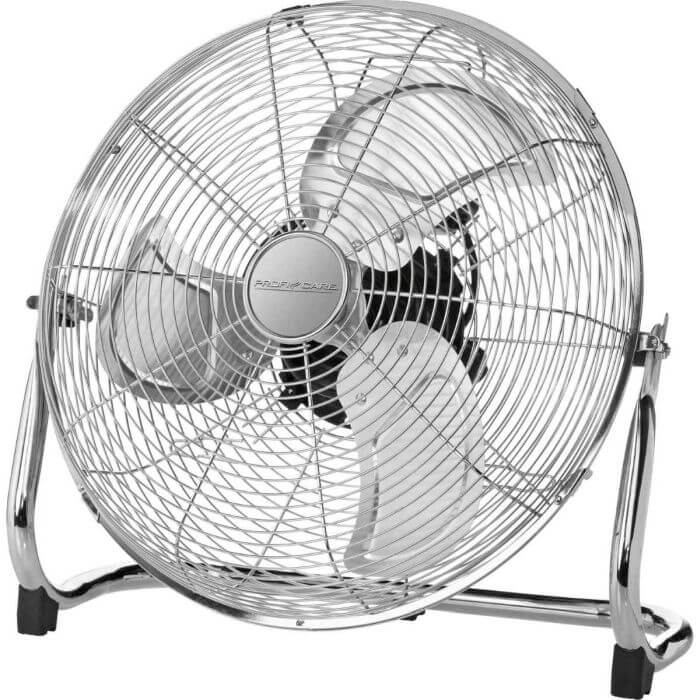
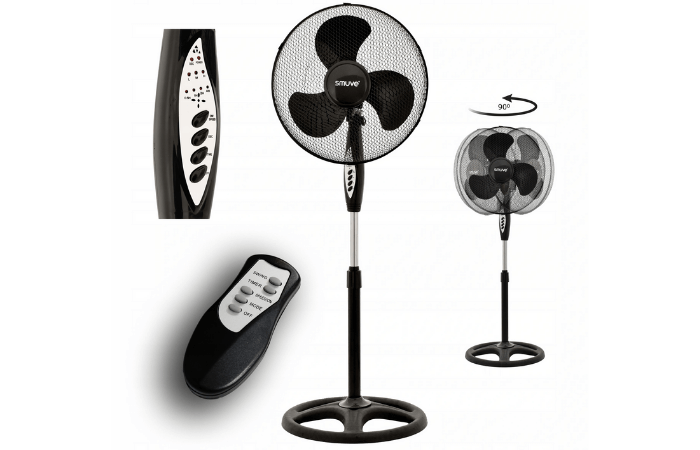
When we hear the words “floor fan”What is the first picture that comes to mind? A device with an axis is represented, and we will start with it.Rotating blades, three or more, mounted on the mechanism and installed in a protective metal case so that during operation they do not get hurt on rotating elements. Mounted on a tripod for stability. The guided air is blown horizontally. You can install in one position, or you can adjust the head to rotate. Thus, there is circulation throughout the room.

rating of the best fans for the house 2021 floor

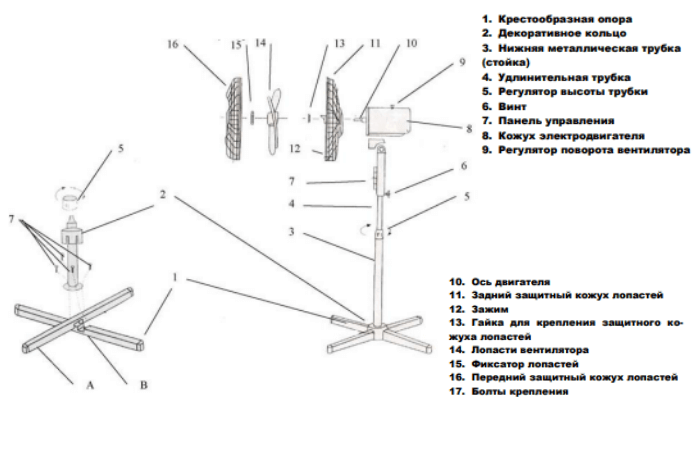
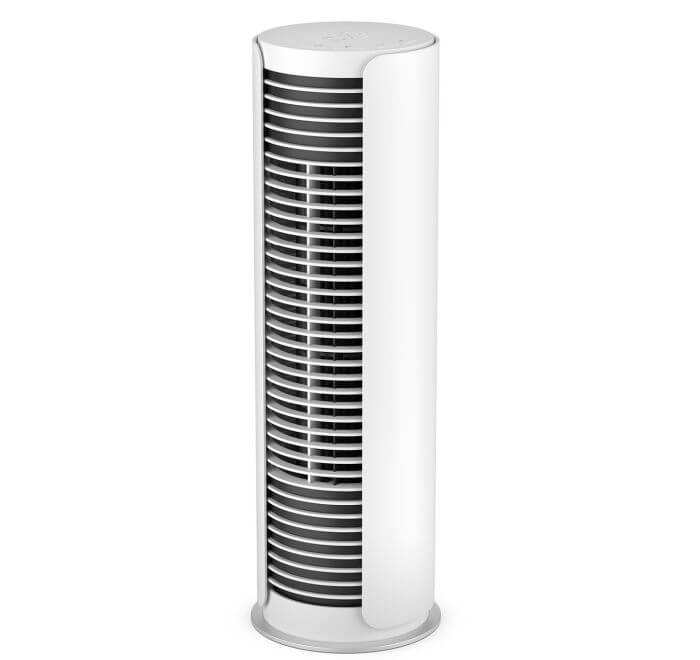
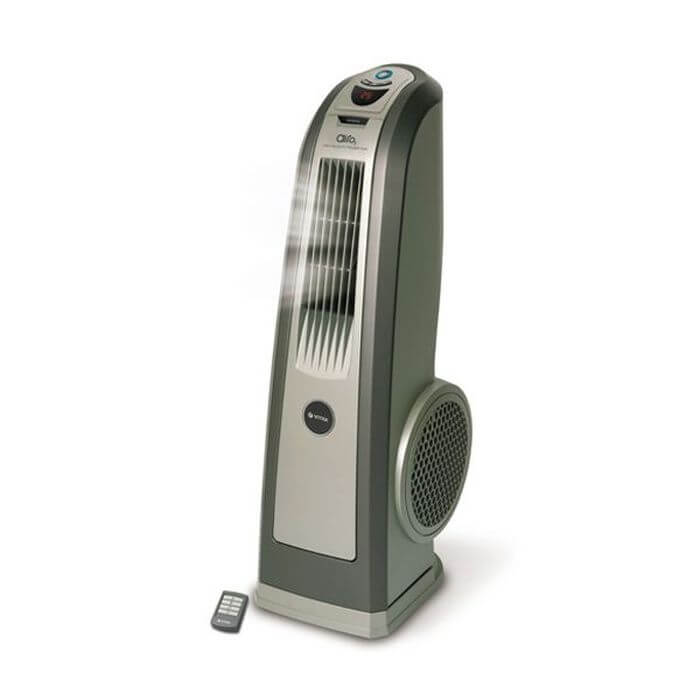
Radial floor fans are like a column. The principle of operation is the entry of air into the cylinder and its subsequent expulsion into the room. There are models with an air outlet on four sides, and there are only one. The direction of the blown air depends on this. The device has a stable leg and convenient control, several modes that can be adjusted by pressing the buttons. The design is not heavy and easily moves around the apartment, fits in the trunk of a car.

powerful floor fans for home

We can not ignore the bladeless fan, the feature of which is the turbine through which the air passes. The ventilation is strong, even and continuous, but the flow rate can be adjusted. Such fans are safe for children: a child's finger or other object cannot enter the case.

Installation methods

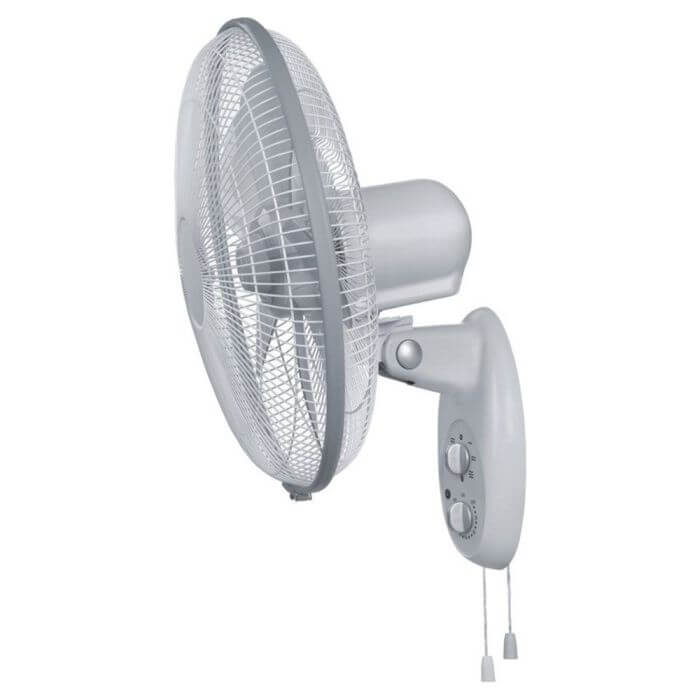
Fans can be mounted on the ceiling, wall or placed on the table, but today we are talking about floor fans. The fan installation method is simple and does not require calling a wizard. It is enough to read the assembly instructions, tighten the necessary parts, put the fan on the floor and plug it into the socket - the device is ready to work. Choose a mode and enjoy the cool air.

wall fan

There are some models that run on batteries, it is convenient to take them with you on trips and move around the apartment, because.they are small in size. But there is one thing - they are weak in work.They are able to disperse the air only in a small room, otherwise they require a close location to the workplace.

powerful floor fans for home

In terms of power and performance

The more powerful the model, the more room it can serve. The recommended working area is indicated in the instructions for the device. Models can have the same performance and different power, or, conversely, the quality of the blown air will depend on this.

floor fan column for home

Noisiness

I want to buy a non-noisy device, but how to find out which one is the quietest? Basically, the more powerful the model, the more noise it makes in operation. But some manufacturers supply devices with additional noise suppression devices. Therefore, if a fan is bought for a bedroom or a children's room, you need to pay attention to the device parameters in the instructions.

floor fan for home

Differ in management

Inexpensive models have mechanical control, these are several buttons on the body of the device, when pressed, the strength of the blown air changes. Fans with electric units are more expensive, but they are more convenient to use. To change the direction of air or power, you just need to press the button on the remote control.

top floor fans for home

Today you can find models with control through a mobile application. Also come with a digital display, backlight, timer and temperature indicator.

rating of the best floor fans for the home

Design

As noted above, home fans vary in shape, size, and power. When choosing the right fan for yourself, be sure to pay attention to stability and noise level.

what floor fans are best for home

Inexpensive fans with axial blades are not very stable and can fall over when lightly touched, which is not safe if a child or pet is around. Also, the design is quite fragile and the fan can shatter into elements from impact. In this case, you will have to reassemble the device.

floor fans for home reviews

Radial in this regard inspire more confidence. The fan stands firmly, it is convenient to place it in a corner or in other places of the room, it will not fall, unless, of course, it is dropped on purpose.Quiet floor fan for the home, has large plastic blades, makes less noise than metal blades.

floor fans for home

Equipment with additional functions.

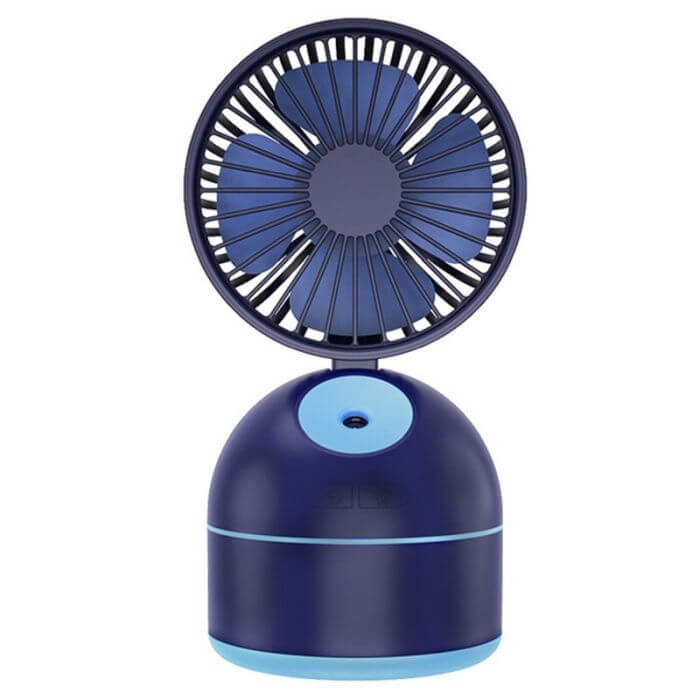
You can buy a model that acts not just as a fan, but also humidifies the air, ionizes or is used as a heater.

Rating of the best models

Rating of the best fans for the home according to consumer reviews.

  1. Column fan Tefal VF6770F0.
  2. Column fan Ariete 843.
  3. Zanussi ZFF-901 with backlight and remote control.
  4. Column fan Bork P604 GG.
  5. Fan Royal Clima RBF-99E-BL.
  6. Fan Mystery MSF-2446.
  7. Fan Ergolux ELX-FS02-C31.
  8. Fan with humidifier and remote control DELTA DL-024H-RC.
  9. CF-2008, Column type.
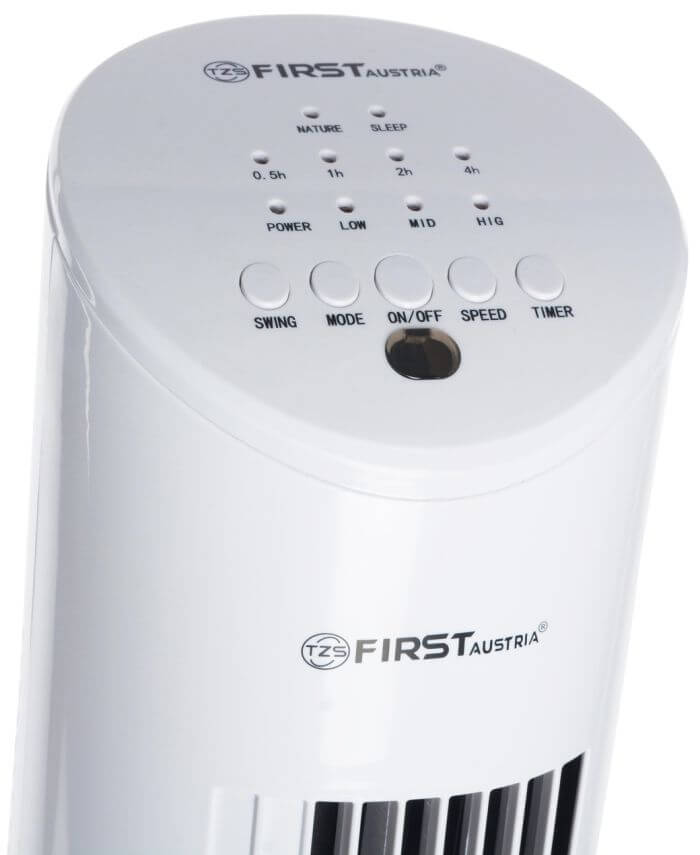
  10. Floor fan FIRST AUSTRIA 5560-2.

Many women are familiar with the situation when, when ironing, the iron sticks to clothes and leaves marks. Of course, this is very unpleasant, especially if your favorite thing is damaged or you are urgently going to work and burned your only white shirt. But not many people know that burnt clothes can be reanimated and they will last for more than one year. In the article, we will talk about how to remove an iron stain on clothes, the causes of burn marks and how to hide strong burn marks.

how to remove iron marks

Causes of tanning

  1. Unstable operation of the iron - the device is not working properly and cannot function correctly.
  2. Incorrect temperature setting - according to the type of fabric, you need to choose a low or high temperature to ensure smoothing. For some materials, only delicate ironing is suitable.
  3. Non-compliance with safety rules - too much pressure on the iron or plugging the device into a faulty outlet.
  4. Inattentive attitude to ironing - the phone rang, they were distracted or did not turn off the iron after work and left it on clothes.

fabric ironing mode

If there is a trace of the iron, it can be removed by folk methods, but in order not to spoil the fabric, it is better to be attentive to ironing. Heat treatment of things requires compliance with safety measures and respect for clothes and iron.

How to remove iron marks from clothes

If a burnt thing that has been put away in a “long box” has lain for a long time, then it is difficult to reanimate it. You need to start working with it immediately after an unsuccessful contact with the iron, and then there will be more chances to save your favorite blouse and T-shirt. As soon as the iron has stuck to the item, it must be carefully removed without sudden movements so that traces of the fabric do not remain on the soleplate of the iron.

how to remove iron marks from clothes

Next, you need to turn on the tap and well rinse a thing under pressure water, thus we stop the penetration of hot air into the fibers of the fabric. We squeeze out the thing and put it on a hard, flat surface and proceed to the preparation of the “rescue mixture”.

how to remove iron marks on fabric

We take any washing powder, it can be automatic or for hand washing. Dilute with water to a thick paste. Apply to the tan and lightly rub into the fabric. It is not necessary to rub for a long time so as not to break the weak burnt villi. Next you need to rinse.

how to remove iron marks

We do not use hot water, so as not to cause a “shock state” in the fabric. Water at room temperature works well. The method helps if the burn is small, and we reacted in time. For more complex marks, you can use folk remedies, chemicals, or dry cleaning services.

how to remove burn marks from an iron on synthetics

Removal methods depending on the color and type of fabric

Burn marks appear and disappear differently, depending on the quality of the fabric. If the material is dense cotton, then it is more difficult to spoil it with an iron, but synthetics, linen or silk can be seriously affected by high temperatures.

how to remove iron stains on clothes

Next, we will consider how to remove burn marks from the iron from clothes by the type and color of the fabric.

how to remove burn marks from an iron

Black colors - in the wardrobe of every woman, man or child, there are things in black. This is a universal shade that is used for school uniforms, evening dresses and formal trousers for office workers.Therefore, first consider what to do if you burnt a black fabric with an iron.

Many housewives are saved with laundry soap, it not only cleans stains from clothes and furniture well, but also fights burns after ironing. Take a bar of soap and rub it on a coarse grater, then add water and stir. We lower the gauze into the resulting mixture, take it out, but do not squeeze it out. We put it on the stain and lightly pass it with an iron, if the trace has not disappeared, we proceed to the next method.

iron marks on black how to remove

Acetic acid - Another universal remedy that is part of many folk cleaning products. Stir 18 ml of acetic acid in a glass of water, then take a cotton swab or other soft cloth and moisten in the solution, wipe the burnt spot.

how to remove iron marks on black clothes

Newspaper also removes burn marks from clothes, for this we put clothes on a flat and hard surface, on top of a newspaper and iron it with an iron.Do not take too thick a sheet layer and do not turn on the heat.

newspaper for stains

pumice stone and eraser - we are used to the fact that pumice is used for grinding and as an abrasive material. Now we will tell you how to use a pumice stone or eraser to remove a burn on black. The secret is simple: we take an eraser or pumice stone and clean the carbon deposits from clothes with gentle movements.

how to remove iron marks on black

Tea - you can not only drink, but also use to remove tan marks. We take black tea leaves, if there is no bulk, then sachets will do, pour boiling water and wait for it to infuse. We lower the gauze or a piece of cloth, wring it out slightly and put it on the surface to be treated, go through it with a little iron.

We learned how to remove iron burns on black fabric, but in our closet there are synthetic and natural fabrics of other colors, which can also be accidentally burned. Therefore, consider what to do if a stain has formed on synthetics or cotton.

iron marks on clothes how to remove

  1. Sugar and lemon - cut the lemon in half and put one half on the burnt place, press and drive, you need to make an effort.Next, sprinkle with granulated sugar, you need to fill up the whole stain. We put the clothes in a warm place so that the mixture of sand and lemon dries, then you need to wash the thing, but not in boiling water.
  2. Hydrogen peroxide - mix the solution with water in a bowl, dip gauze or a soft cloth, wring it out slightly and put it on the burn. We pass with an iron, do not forget that it is not recommended to use a strong temperature regime. Another way is suitable for light fabrics. Pour peroxide on the stain and leave for ten minutes. The dark burn should brighten, if this did not happen, repeat the method, then erase.
  3. Onions - we clean and cut the onion, rub the stain and send it to wash, as in other cases, you need to use warm water.
  4. Kefir - if there is a trace of the iron, the thing can be soaked in kefir for 50-60 minutes. After we take it out, wring it out and wash it.
  5. Salt solution - take 7 grams of salt and dilute with water to make a thick slurry. Apply to the stain and wait for it to dry. After cleaning, an old toothbrush, an iron dish brush or a piece of pumice stone will do.

left a trace of the iron how to remove

For cotton, you can use bleach, pour a few grams into warm water, stir and apply to the fabric, rinse off after 2-3 minutes. Hydrogen peroxide and ammonia are good for wool.

how to remove iron stain

Mix the same amount of both liquids and apply to the stain. Denatured alcohol will remove burns from viscose, for this we pour a small amount onto the fabric, then we erase it.

what to do if you burned a synthetic fabric with an iron

For silk, we take soda and dilute it with water to make a slurry, apply it on the stain, wait for it to dry and wash it.

how to remove iron marks

How to hide strong burn marks and burn marks?

If the tan is strong and yellow remains on light-colored clothes, and there is a shiny trace on black, then there is also a way out. The burn can be removed by the following methods:

  • rub the onion, it should give juice and you will get a gruel, put it on a shiny mark and leave it for 3-4 hours. Then soak the fabric for 10 minutes in running water and wash;
  • boric acid - diluted with warm water, mix and pour on the burn, wait 10 minutes and wash;
  • burns are the most difficult to remove from white things; peroxide and ammonia will help. We take cold water 100 gr, a few drops of ammonia and 7 ml of peroxide. We moisten clean gauze and put it on the treated area, wait 5-7 minutes and rinse the thing.

what to do if you burned a synthetic fabric with an iron

Yellow burns are easier to clean than brown ones, so if the stain is large or strong, the item will have to be processed several times. But if you want a result, then you can spend time. In addition to folk methods, chemical stain removers are sold in hardware stores, which will also help get rid of tan marks.

Remote-controlled toys, that is, radio-controlled (Radio Control) are popular not only among children, but also among adults. Playing these gadgets together can be fun for the whole family. RC cars are still the most popular, but there are also floating vehicles and flying models. If you are going to buy such a toy, you should consider several points. How to choose the best toy?

Transport scale and management

The first parameter to pay attention to is the scale, which indicates the size of the model in relation to the original. The scale shows how many times the model is smaller than a full-size machine or other vehicle. Remote control toys designed for children are small in size, so they prevent riding on uneven terrain. You can play with them at home or on a flat surface, but not, for example, on the grass. The scale of toys that can be found in stores is usually 1:43, although you can also find models with a scale of 1:30, 1:16 or 1:12. Professional remote control models designed for experienced enthusiasts even have a scale of 1:10. If you are just starting your acquaintance with remotely controlled vehicles, it is worth choosing products that are slightly smaller.


The next parameter is the distance the vehicle can travel from the remote control.In children's cars, the remote control range is usually 10 m. What does the control actually look like? The remote control operates on a specific radio frequency. It can take the form of a game controller, a pistol, or a steering wheel.

Power and speed

Remote controlled vehicles can be powered in two ways: batteries or rechargeable batteries. Both vehicle and controller must be powered. If the model is powered by a battery, a charger must be included. This is worth paying attention to when buying a vehicle.

The speed at which your toy will move is also important. Children's radio-controlled cars usually develop a speed of 7-10 km/h. For the little ones, you should choose cheaper models, and for older children - with additional features. There are toys on the market that are almost identical to the original, such as the Ford Mustang, Ferrari Enzo or Formula 1 cars from 1969. They have a solid die-cast metal construction. The machines are resistant to damage, they have strong suspensions and their range reaches several hundred meters! If you can afford to buy a more expensive toy, it is definitely worth investing in a model that will last you longer and bring you more pleasure.

Tula is a quiet town located 185 kilometers from Moscow. A pleasant climate, an abundance of religious sites, gingerbread and samovars - this is what this Russian corner is so famous for. Many cultural monuments dating back to the 18th-19th centuries and unique museums have been preserved on its territory.

The Tula Kremlin, which is considered one of the most famous in all of Russia, is located in the historical district of the city. It is the most important tourist magnet of the city and is considered a model of Russian architecture. In addition to towers and walls, the attraction impresses with majestic cathedrals, shopping malls dating back to the 19th century, and the first Tula power plant.

This place will be of interest to all history lovers.It will help you immerse yourself in the atmosphere of unsolved mysteries and mysteries and get to know the people who contributed to the development of the city better. The most popular parts of the attraction are the sacred sacrum and the torture chamber. The main feature of the architecture of the building is its location: it is located in a low and swampy place. However, its powerful foundation has demonstrated its reliability for many centuries.

Since the main symbol of the city is gingerbread, there is a museum dedicated to this delicacy on its territory. Within its walls, everyone will have a chance to get acquainted with the history of the product and the traditions of production. Local residents claim that gingerbread in Tula began to be made before the production of weapons: the first mention of the famous dessert dates back to 1685.

The main exposition of the "Tula Gingerbread" is the history of the product and the traditions and folk rituals associated with it. The museum houses old gingerbread boards that previously belonged to famous Tula confectioners, as well as photographs and packaging. Visitors can also see the products themselves, which were released on the occasion of important dates: in honor of the anniversary of the Battle of Kulikovo or the coronation of Nicholas II.
Museum staff talk about how to properly give gingerbread for name days or weddings.Also here you can see the smallest and largest exhibits of the museum: the first barely reaches the size of a coin, and the second weighs a pood.

On the territory of the former Kuznetskaya Sloboda, and the historical district of the city, there is a museum dedicated to the dynasty of metal industrialists - the Demidov Necropolis. It was created in 1996. The date of its foundation coincided with the 340th anniversary of Nikita Demidov, the founder of the dynasty.

The architecture of the complex includes a bell tower, a family tomb, a memorial square, an introductory hall.There is also a room dedicated directly to metal. The most popular room of the museum is the necropolis, where all the presented surnames are buried. The church, which houses the chapel-crypt, was built in the 1730s, and in early 2000 its doors were opened to visitors.

Tula is one of the most symbolic cities in Russia. He managed to transfer his uniqueness and originality through the centuries.

Rating of budget washing machines. Which manufacturer do you prefer?

Budget washing machines usually offer to sacrifice a high spin rate, remote control, bubble washing or drying technology, in exchange for an affordable cost. At the same time, the quality of the laundry itself remains at a high level, the equipment is as reliable and is presented in a wide range of sizes, like more expensive devices.

BEKO WUE 6511 XWW

The Beko WUE6511XWW automatic washing machine offers 15 washing programs for any type of linen and fabric. The pre-soak feature saves time and effort. This model has a frontal type and a capacity of up to 6 kg. The control panel has rotary switches and an informative LED display.Simple maintenance of equipment, respect for fabrics, the presence of security and protection systems have made BEKO WUE 6511 XWW one of the best inexpensive models on the market.

  • washing / spin class - A / C;

  • capacity - 6 kg;

  • dimensions - 60x84x44 cm;

  • noise level - 63 dB, spin 75 dB;

  • power consumption - A +++;

  • number of programs - 15;

  • additional functions - quick wash, pre-soak.

The average price is 6 467 UAH.

Atlant СМА 60С88-10

Atlant CMA 60C88-010 is a Turkish front-loading washing machine, designed for 6 kg of laundry in one cycle. The peculiarity of this model is a huge number of programs, there are 23 in total. There are separate modes for sports shoes and clothes. The maximum spin speed is 800 rpm, thanks to which the fibers of the fabric do not deteriorate, and the clothes retain their original appearance longer.Convenient electronic control and child lock system simplify the use of equipment.

  • washing / spin class - A / D;

  • capacity - 6 kg;

  • dimensions - 59.6 × 84.6 × 56.5 cm;

  • noise level - 59 dB, spin 68 dB;

  • power consumption - A +;

  • number of programs - 23;

  • additional functions - self-diagnosis, water cooling before draining.

The average price is 6 605 UAH.

Indesit IWSD 51051UA

A number of effective programs for various types of washing is one of the main advantages of the washing machine. The user can select the "Sport" or Eco Time mode depending on the type of laundry. The pre-soak function allows you to effectively remove stains and minimize manual work. Delay start up to 24 hours will allow you to start washing during sleep, so that in the morning you can hang fresh laundry.

  • washing / spin class - A / C;

  • capacity - 5 kg;

  • dimensions - 60 dB, spin 76 dB;

  • noise level - 59 dB, spin 68 dB;

  • power consumption - A +;

  • number of programs - 16;

  • additional functions - stain removal, pre-soaking.

The average price is 5 878 UAH.

conclusions

A review of popular models showed that even inexpensive washing machines can offer high efficiency and functionality. If you are willing to put up with the disadvantages of a lack of modern features and design, then the budget option is ideal for you and will help save your money. Against the background of the analysis, you can arrange the selected machines in the following order:

  1. BEKO‌ ‌WUE‌ ‌6511‌ ‌XWW‌

  2. Indesit IWSD 51051UA

  3. Atlant СМА 60С88-10

The best price/quality ratio is offered by the BEKO washing machine‌.

The washing machine does not turn on - this situation is familiar to almost every housewife. Sometimes a problem shows up unexpectedly. For example, after the powder has been filled up, and the laundry is loaded into the tank, but the machine does not react in any way to attempts to turn it on. From the unexpectedness of this breakdown, the situation becomes even more unpleasant.

The reason that the washer suddenly does not turn on can be caused by several of the factors. It is also important to study the symptoms of a breakdown. For example, a device, when a button is pressed, does not give any signals at all, or only one indicator lights up and nothing else works. The solution will be individual methods of repair work. Some malfunctions can be fixed on your own, while others will require the help of a specialist.

Causes of failure if the machine does not turn on at all

If at startup the machine does not react at all to pressing the button, there is a possibility of a power outage. The first thing is:

  1. Check the power supply.
  2. If everything is fine with the mains, the problem is in the outlet. And it is possible that the automatic switch suddenly knocked out, or water got into the outlet.
  3. You need to check the machine through which electricity is supplied to the machine.
  4. You need to turn it on again.
  5. It is also necessary to check the serviceability of the outlet using an indicator screwdriver. If there is no equipment to test the outlet, the easiest way is to plug another (working) device into the outlet.
  6. It is also necessary to inspect the cord for external damage. It may be severely bent/damaged. Use a multimeter to test the cord.

If none of the above methods could, then the reason for this problem lies in the washing machine itself. One of the most common breakdowns is a malfunction of the power button. On some models, the current goes to the power button. Its failure may affect the start of the device. It is best to use a multimeter to test the button.

The surge protector, which protects equipment from power outages, could also break. It participates in the electricity supply circuit, so a breakdown may make it impossible to turn on the washer.

If the machine does not turn on due to a power failure, we recommend that you contact our field service center.You can order repairs at affordable prices at the field service center in St. Petersburg.

Why does only one indicator light up when turned on?

If the machine responds to the start, one indicator turns on, and 0 reactions to other commands, there may be several reasons for this. It often happens that the machine does not draw water, it is not possible to select or set the mode, but at the same time it is turned on.To begin with, it is worth checking whether the hatch door is tightly closed. It is possible that some things prevent the hatch from closing, so the wash does not start. If nothing prevents the hatch from closing, but it still does not block, then the problem may lie in the blocking device.

It happens that when you start the appliance, all the indicators turn on, but still the washing does not start. Such a common problem will indicate a wiring malfunction or a breakdown of some parts inside the machine.

More and more families are buying dishwashers to save their time. This time can be devoted to family, children, work, walks and other important things. Because of this, the popularity of dishwashers is growing every day. The store has a huge selection of dishwashers, the main of which are built-in. They do not take up a separate place in the kitchen and fit compactly into any kitchen set.

The installation of the dishwasher can be entrusted to the master. But if this is not possible, then people install it themselves without any problems. Built-in dishwashers are installed both under the kitchen set (invisible, under the facade) and open. Dishwashers that are arranged under the facade of a furniture set will last longer. One of the important advantages of installing a facade is child protection. The child will not spoil the appearance of the machine, will not touch the buttons, thereby ensuring the use of the dishwasher without the risk of harming both the child and the machine.

how to hang a front on a dishwasher

Self-installation of facades

To independently install the machine in a kitchen set, you need a separate niche in this set. The dimensions of the niche must match the dimensions of the dishwasher. In addition, there should be no back wall and bottom.

dishwasher installation

The machine itself is installed on the floor, on the steps. The rear wall of the kitchen furniture for the machine is not needed due to the connection of hoses: drain and water supply.

The front panel is attached to the dishwasher door.

What is the point of the façade? The facade is a decorative panel that is identical in color and characteristics to the kitchen set. It can be made of different materials: MDF, plastic, chipboard, solid wood and other materials.

Such a decorative insert is acquired in several ways:

  • independently made from the doors of a disassembled cabinet;
  • made to order together with kitchen furniture;
  • any facade similar in style and size is selected.

dishwasher front size 45 cm

The installation of the machine is carried out in several stages, the main one is the connection to communications (water, light, drain). The installation of the facade is carried out at the end, when everything is already connected and installed in the headset. To prepare the installation of the facade, you will need: a screwdriver, a drill, a screwdriver, an awl, a tape measure, a marker, double tape.

Adhesive tape or Velcro is needed in order to carry out a trial fitting of the facade on the dishwasher. Since an error of 2-3 millimeters can be serious and you will have to reinstall everything again.

dishwasher front installation

Stages and technology of facade installation

When all the tools are in place, the facade is ready, the dishwasher is installed, then you can proceed with the installation work.

Stage number 1 - determining the dimensions of the facade panel

The dimensions of the panel must match the dimensions of the dishwasher. For 60 cm dishwashers, the front width should be 59.8 cm. For 45 cm models, the front width is 44.8 cm. But there may be exceptions.

If we talk about the length of the facade, it all depends on how convenient it will be to open the dishwasher door.So that it does not touch other parts of the kitchen set.

dishwasher front installation

Stage number 2 - choosing a method of fixation

The installation of the facade must be carried out strictly according to the instructions that are attached to the dishwasher. If you do it differently, you can run into trouble.

installation of the facade on the electrolux dishwasher

You can not glue the facade on the glue. The facade may peel off due to temperature changes, because the adhesive will lose its properties. Or vice versa, stick firmly, which is also not very convenient if you need to disassemble the machine later.

Well, it is not recommended to stick the facade on adhesive tape, because of the gravity of its own weight, vibrations, the facade can fall off.

how to install front dishwasher

Stage number 3 - sequential installation

At this stage, you need to carefully check the location of the dishwasher relative to other objects in the kitchen set. It should not be crooked, lower or higher. Otherwise, the facade will also be installed crookedly in relation to the rest of the furniture.

Once again, you need to double-check the dimensions and you can tighten the fasteners.

bosch dishwasher front installationAfter the work with the fastening of the facade is completed, you need to proceed to the side fastenings of the case. In order to carry out work on the side fasteners, you need to pull out the upper basket for dishes from the dishwasher and screw the screws into the side walls from the inside. Self-tapping screws must be suitable in length.

how to remove front from dishwasher

Installation nuances

When installing the front panel, the use of a tape measure is mandatory. Installation "by eye" is very risky.

dishwasher front

Before starting installation, you need to check the dimensions again. It is better to take measurements once again than to disassemble again and spoil the facade.

dishwasher front

The selection of self-tapping screws in length is also important. Too short will not guarantee that you have successfully fixed the panel.And long ones will spoil the appearance of the facade.

When attaching the facade handle, you need to rely on other cabinet handles, on how they are located on the headset, so that it looks equally even.

To prevent the door from closing during installation, heavy books or objects can be placed on it. A regular screwdriver is suitable for fastening the panel, however, using a screwdriver is more efficient and faster. When the facade is installed, you can start operating the dishwasher.

dishwasher front installation

If a Bosch or Siemens dishwasher is purchased, a ready-made set of screws, fasteners and self-adhesives is attached to them. In the case of equipment from Hansa, Miele, you will have to select materials and do it yourself.

Helpful Hints

Experienced engineers advise when assembling a kitchen to start not with furniture, but with the installation of household appliances.

dishwasher front attachment

  1. Before installing the facade, you can practice on a board with a thickness of 16mm to avoid mistakes in the future. In addition, the template will be able to designate future installation points for fasteners.
  2. You need to drill holes for fasteners carefully, it will be enough to drill three-quarters of the thickness of the panel, no more.
  3. The best option for the material for the panel is MDF. It withstands all temperature conditions, is not exposed to moisture, is not toxic to humans and is considered the most durable material.

Following the tips and step-by-step instructions, you can easily install the panel on the dishwasher yourself, even without the use of special skills and abilities.

In order to equip a full-fledged personal cinema in your house or apartment, it is not enough just to purchase expensive professional equipment.Here it is important to determine your own desires and capabilities, relying on the advice of a specialist.For example, if you decide to allocate a separate room for a home theater, then you do not have to drastically sacrifice the design and functionality of the room in favor of sound. However, if only a zone in a room is allocated for a cinema, then it is simply necessary to seek a compromise and mask parts of communications (cables, sockets, etc.). Of course, if this is a cottage, then you can not allocate part of the budget for soundproofing, which cannot be avoided in a single apartment (where, by the way, you need to consider whether to isolate the sound coming from the neighbors, or, on the contrary, the sound coming from your cinema) .

The most common mistakes made by those wishing to acquire a personal cinema are the purchase of an acoustic system that is too powerful for a small and, most importantly, home space, as well as projection equipment that is too large. We must not forget that a personal cinema should be, first of all, comfortable in all respects.

A soundbar is a narrow and long soundbar that houses speakers, a turntable, and a sound processor. Such sound systems are usually installed under the TV, on a stand next to it or mounted on the wall, taking up little space. To connect to a TV, conventional optical and HDMI connectors are used. The soundbars are also equipped with Bluetooth and Wi-Fi, allowing you to use smartphones, tablets and other devices as a sound source.

Audio equipment manufacturers, having analyzed the demand for soundbars, decided not to stop at the achieved results and further improve the soundbar's capabilities.

The soundbar can be represented as a simple (active speaker) designed only to amplify the sound that comes from the TV. Such a soundbar cannot boast of high sound quality and does not have advanced functionality. Usually comes with a subwoofer, but can also be an independent speaker.

Another thing is that the soundbar is a small acoustic element of the "home theater" with a strong multi-channel surround sound. Its sound is similar to the sound of full-size home theater acoustics.

The most expensive type of soundbar is the full featured, multi audio system. It provides not only high-quality three-dimensional TV sound, but also the possibility of listening to music in Hi-Fi quality.

Like other household appliances, dishwashers need to be serviced. This will allow the devices to work for a long time without damage. It is especially important to keep the filter inside the dishwasher clean, because its insides gradually become clogged in the process of trapping food and other debris. This interferes with the normal operation of the device, which leaves dirt on cups, spoons and plates.

When carrying out welding work, you may need a welding mixture that can be filled into cylinders. The presented mixtures have the necessary certificates of quality and safety.

In obsolete models of dishwashers, non-removable filters with an automatic cleaning function were installed, which were based on the principle of a garbage chute. However, they were too noisy, so the manufacturers switched to removable filter units. Their owner must dismantle once a month to remove accumulated dirt.If a bad smell is emitted from the PMM, when diagnosing problems, first of all, you will need to check the condition of the filter.

How to dismantle the PMM filter

To perform cleaning procedures, the owner must remove the filtration unit. In most models, this element is located on the bottom. If the search is difficult, it is recommended to look at the instruction manual for the dishwasher, which describes in detail the purpose and location of each node. On modern units, there are easily unscrewed cylindrical filters. On their front side there are arrows applied by the manufacturer.

They indicate the direction in which the device can be rotated when dismantled from the flat panel without using tools during operation. It is enough for the owner to unlock the filter with an ordinary turn, and then remove it with his own hand from the dishwasher body. However, if there are fasteners, the dirt-catching device will have to be picked up with a screwdriver or tweezers. If the operations are performed correctly, the second filter structure will follow the first one.

How to clean the PMM filter

The removed filter must be immersed in a solution with a means for washing kitchen utensils, having previously been treated with a degreaser. Also a great option is to use table vinegar, which is diluted with clean water. This substance will eliminate bad odors, but it is recommended to wipe the dishwasher filter with it only with a non-hard sponge, bottle brush or an old toothbrush.

If you scrape the surfaces with an iron brush, you can damage the walls.In the process of soaking the filtration device, it is recommended to wash the dishwasher itself by wiping the area around the hole where it was located. Dishwashing liquid diluted in hot water, as well as a soft sponge, will help to carry out the work. After drying, the filter can be inserted into its rightful place, and then continue to operate the dishwasher in normal mode.