If you have a bearing buzzing in the washing machine or completely “crumbled”, then replacing it is simply necessary so that the machine can continue to function, because as a result it will start dangle drum and subsequently deteriorate other components of the machine. If you do not change the bearing in time, then the operation of such a machine can cause such consequences that will force you to change the entire washing machine.
If you decide to replace, then you have two options:
- Calling a repairman and entrusting the matter to a professional is the most convenient option that guarantees you that all the work will be done correctly (subject to the professionalism of the master) and in the shortest possible time. But how much does it cost to change a bearing in a washing machine today? The numbers can actually scare off many, because the cost of repair can be from 30 to 50% of the cost of a new washing machine.
- If the price of the repair turned out to be high for you, or if you think that this work can be done on your own, then this information will be useful to you.
Here we will step by step analyze all the stages of repair.
Preparation for repair
Before proceeding directly to the repair of washing machines in Moscow, you need to prepare the necessary tools and spare parts that we will change.
From the tool we need:
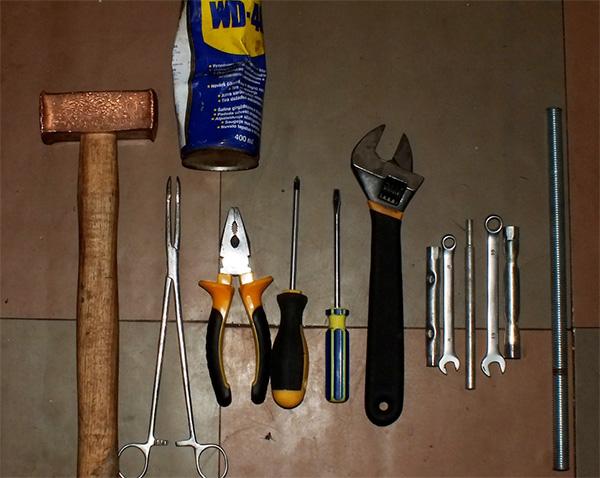
- Ordinary metal hammer
- Set of open end wrenches in different sizes
- pliers
- metal rod
- Screwdrivers (Phillips and slotted)
- Silicone sealant.
- Special waterproof grease for bearings of washing machines (in extreme cases, lithol)
- Camera or camera phone - when disassembling the washing machine, we recommend taking pictures of all the parts that you are going to disassemble, so that the assembly process is as simple as possible.
Required spare parts for repairs
Of the spare parts for repair, we need two bearings and an oil seal, which must be purchased. For more confidence in the correct purchase of spare parts, you can first disassemble washing machine, pull out the old bearings and oil seal, and then find the originals or analogues on the Internet by the numbers on them. Or find stores selling spare parts for washing machines, and by the brand of your machine, they will select the necessary parts for you.
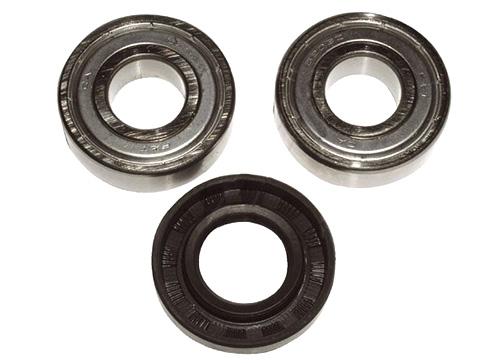
Try to buy original spare parts, they guarantee you a long service life. Also buy only bearings that are designed for washing machines (they are usually closed).
Do not want to bother with such a complicated repair of your washing machine? Read the rating of washing machines and choose the best new washing machine for yourself.
Washing machine disassembly
If everything is ready, then you can start disassembling the washing machine.
Removing the top cover
In order to remove it, you need to open two self-tapping screws located on the rear wall of the unit, then slide the cover back and lift it. Set the cover off to the side. As you can see, it is removed very simply.
Removing the top and bottom panels
After the top cover is removed, we proceed to remove the top dashboard. But, before you start unscrewing it, remove the powder tray: to do this, pull it out and press the special plastic button while pulling it towards you. Set it aside.
To remove the dashboard, you need to unscrew a few screws: in different machines there are a different number of them and they are in different places, but for sure some of the screws are in the place where you pulled out the powder receiver, and another one is on the right side of the washing machine.Unscrew them all, after which you can remove the top panel.
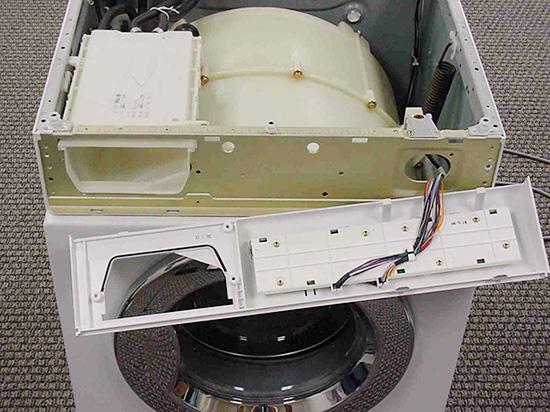
As you will see, a control board is installed on it, connected by wires that will not let you remove it completely. To detach the entire panel, you will need to remove all the chips with wires from the sockets, and then set the top panel aside.
Alternatively, you can not disconnect the wires, but leave the panel hanging, but this is not very convenient and you can accidentally break the wiring.
Now let's start removing the bottom panel: if you regularly clean the drain valve, then you probably know how to do it, if not, then we will tell you how to do it. To remove the bottom panel, you need to use a screwdriver or other flat object to press on the latches holding it and pull it out.
Remove the cuff
Next, we need to remove the cuff, which prevents us from removing the entire front panel of the washing machine. The cuff is an elastic band that is dressed at one end on the tank, and at the other on the front panel, and it's all fastened with a clamp, which we need to remove.Run your hand around the perimeter of the elastic band and feel for the small spring that connects the ends of the clamp, or find it visually. Next, pry it with a flat screwdriver and pull it out along with the clamp.
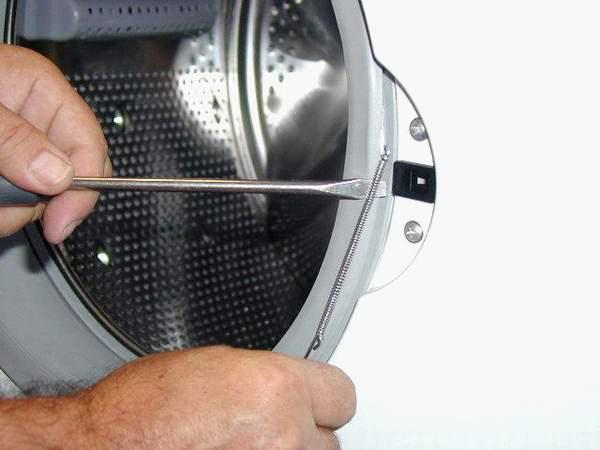
After that, remove the front edge of the cuff and fill it inside the tank.
Removing the front panel
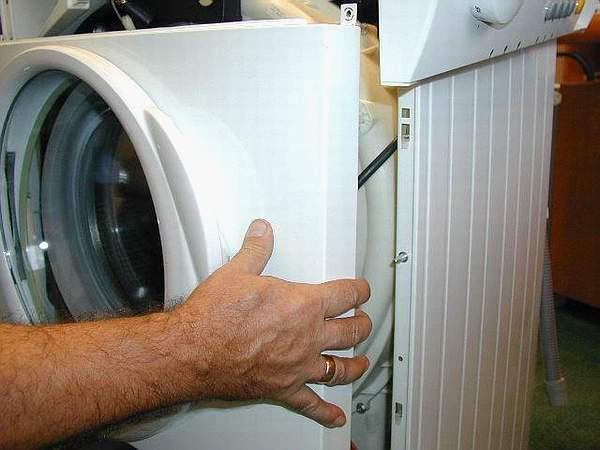
Close the hatch of the washing machine. Locate the top and bottom of the front panel with a few self-tapping screws holding it. Unscrew them, after which the front panel will only be held on a small special hook. Now remove the front panel, but be very careful, because it is connected by a wire to the rest of the washing machine.
As soon as you remove the front panel, disconnect the wire going to the lock of the loading hatch by removing the chip. Then move the panel aside.
Disconnect all parts from the tank of the washing machine
Now we need to remove the top panel along with the powder box, which is located under the control panel that we removed earlier. To do this, you need to unscrew the bolts at the back of the washing machine that hold the inlet valve, since it will be removed along with the panel.
Next, unscrew all the screws holding this panel. Now it can be removed, but pipes and wires interfere with us. Disconnect them and remove this part to the side.
Now we need to disconnect the drain pipe from the tank of the washing machine, for this we unscrew the clamp and remove it.
Next, we disconnect all the wires suitable for the heating element, it can be located both in front and behind the washing machine, so unscrew the back cover if necessary.
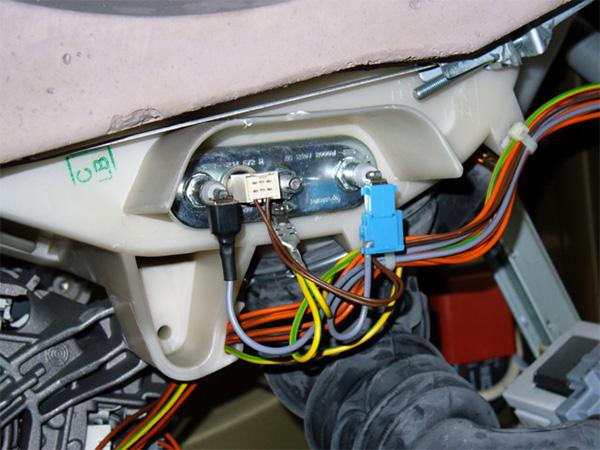
Also, the wiring can be attached to the tank with ties or wire.You need to disconnect it at all points of attachment to the tank. Also disconnect the wires from the engine, since we will be removing it from the outside of the washing machine. If desired, you can disconnect the remnants of the wiring from the pump and pull it out so that it does not interfere while removing the tank.
Now we unscrew the lower and upper counterweights so that they do not add weight to the tank and it is easier for us to remove it. Counterweights can be located both in front and behind the machine.
We disconnect the pipe going to the water level sensor and you can start unscrewing the shock absorbers of the washing machine. To do this, we find the lower bolts that hold the shock absorbers and unscrew them with a wrench.
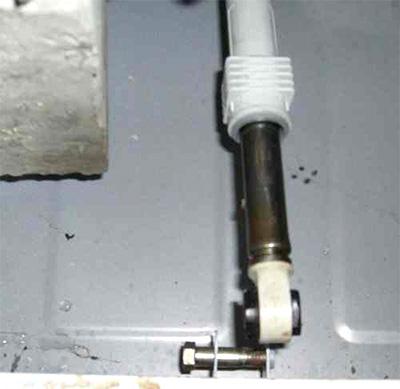
Now the tank hangs with us only on springs, and we can remove it, but do it very carefully so as not to drop it.The tank without counterweights is light enough, lift it from the inside with one hand, and with the other, unhook the springs on which it weighs and pull the tank out.
You will remove the tank along with the engine, which must also be unscrewed, but before that, remove the belt. Next, we unscrew the engine itself, as well as the shock absorbers that we left hanging on the tank.
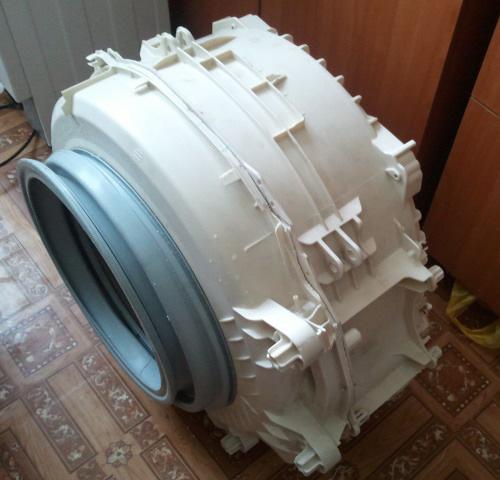
Now we can start disassembling the tank and replacing the bearings in it.
Dismantling the washing machine tank
To get to the bearing, we need to divide the tank into two halves and pull out the drum. Both halves of the tank are fastened either with special latches or bolts that are located around the entire perimeter of the tank. Therefore, either disconnect the latches if the washing machine makes noise, or unscrew the bolts and disconnect the front half of the tank.You can clean it of debris if desired before putting it back together.
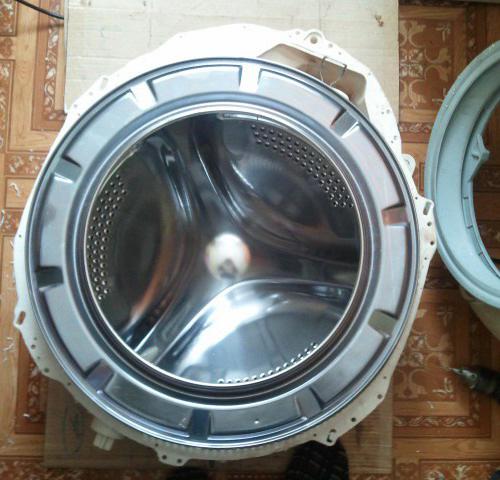
We proceed to disconnect the drum from the back of the tank, for this we need to remove the pulley. We unscrew one bolt with a wrench that holds the pulley on the axis of the drum, after which we remove it from the axis and put it aside. And the bolt that we unscrewed is screwed all the way back into the shaft so that when the drum is knocked out, the shaft itself is not damaged.
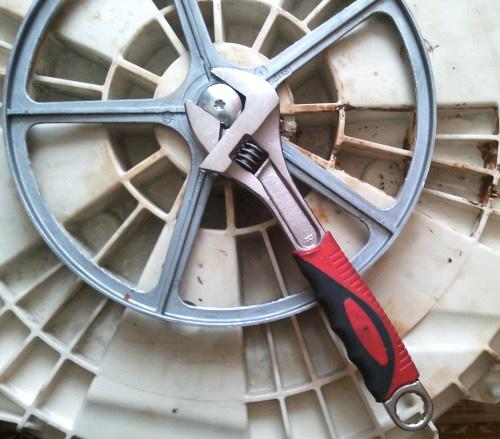
Next, with an ordinary hammer, with a little effort, we knock on the shaft, trying to knock it out. If the shaft is gradually going, then we continue in the same spirit. If the force is already large, but the shaft does not give in, then it is better to unscrew the standard bolt and replace it with any other one that you won’t be sorry to throw out, because with a lot of effort, the bolt can be deformed. As soon as the shaft is drowned to the bolt head, we unscrew the bolt and pull out the drum from the back wall of the washing machine tank.
Inspect the sleeve and the shaft itself, located on the drum.If you delayed the repair, then they could wear out and then you will also have to change the cross, which significantly affects the price of the repair. In order to check the integrity of the shaft, wipe it well with a rag and see if there is any wear on it. For more confidence, take new bearings and put them on the shaft. After that, check that there is not even the slightest play in the bearing. If there is play, then you need to replace the cross with the shaft.
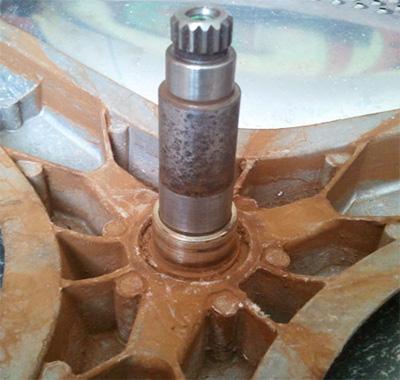
Also check the sleeve, which is located on the shaft and on which the stuffing box is put on, it should also not have strong wear and transverse grooves. Under the condition of high output, the oil seal will pass water and the new bearing will quickly fail.
Washing machine bearing replacement
Having finished with the shaft, we proceed directly to replacing the bearings in the washing machine. They are, as you might have guessed, in the back wall of the drum and they need to be pulled out from there, but before that, let's remove the stuffing box.
In order to pull the oil seal out of the back of the washing machine, take a flathead screwdriver and pry it off.
Now we need to knock out both bearings, for this we set a metal rod as thick as a pencil and with sharp confident movements with a hammer we hit it moving it to different sides of the bearing, cross to cross. Thus, we knock out both bearings.
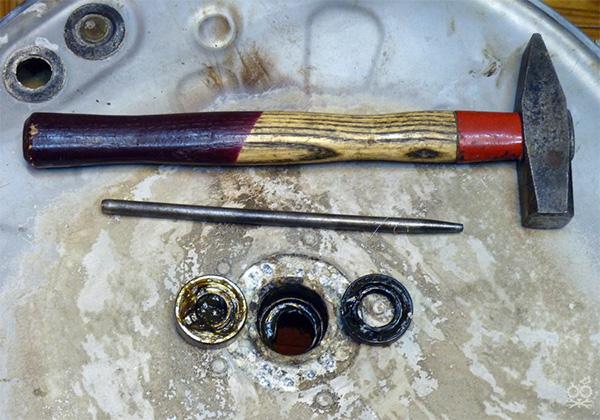
A small bearing is knocked out from the inside of the tank, a large one, on the contrary, from the outside.
After you knocked out the bearings, you need to clean the back cover itself and the seats for the bearings. Not the slightest dirt should remain in them, and they should simply sparkle with cleanliness.
Now let's take the new bearings out of the package.First, we insert a small bearing and also, pointing the rod, hammer it, rearranging the rod on different sides of the bearing cross to cross. Clog the bearing until it stops, when the bearing "sits" in place, the sound from the impact becomes more sonorous.
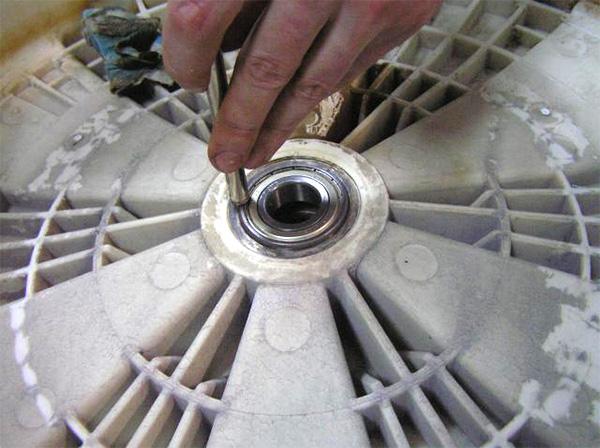
Further similarly, but on the other side of the tank, hammer in a large bearing.
After that, we “stuff” the stuffing box special waterproof lubricant and put it in place. You can lightly hammer the seal with a hammer in the same way as a bearing, but be extremely careful not to damage it.
Reassembly of the washing machine
After the bearings and the oil seal are in place, lubricate the sleeve on the tank shaft with grease and install it in place, i.e., stick it into the back cover.
Now we need to connect the halves of the tank, but before that it is desirable to change the sealing gum. If this is not possible, then you can simply fill the groove along with the gasket with a small layer of sealant in a circle, and then connect the halves of the tank.
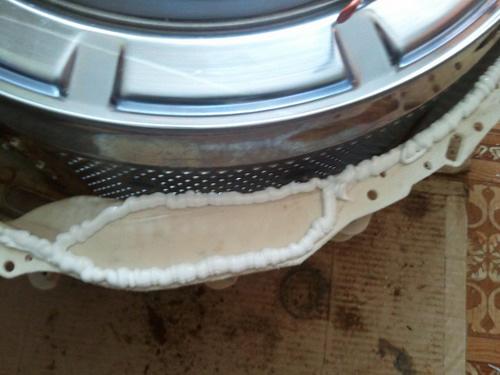
Now it remains for us to assemble the washing machine in reverse order, the photos that you took during the disassembly process will help you with this. You did them, didn't you?
We also recommend that you watch the video instructions for replacing bearings on a Samsung washing machine, which will help you understand the entire repair process more clearly.

Comments
Your info helped me. THANK YOU
I’ll show my husband the article just in case, we always had some problems and breakdowns in the last washing machine, now they replaced it and began to take care of it, I always clean it, dry it, use calgon, for 5 years nothing has broken and washes well. So prevention is also important.
hello! I need advice on what to do.I have an LG 5.5kg machine. she is a year old. half a year ago I began to notice that it makes a lot of noise and vibrates while draining the water, but the drum does not spin at this time. what could be?
We bought a Samsung washing machine at the very first wash, it began to buzz and creak strongly, and on the spin cycle there is such a sound as if the plane is taking off, please tell me what it is, and if we can return it to the store.
Good evening. ElectroluxEWS106210W. Is it possible to replace the bearing?
well done boy! Helped me a lot as a beginner, thanks!
Thank you. Very valuable advice for someone who has never done this before.
Hello! Thanks for the valuable insights. And if, when replacing the oil seal, it is very easy to enter the seat with your hands, is this normal?
good day! tell me what to do if, when removing the drum from the tank, the large bearing crumbled and its inner both remained on the shaft, how to knock it out from there.
Hello. Tell me, how long can a machine with a rattling bearing last?
How much does it cost to change a bearing?
the article is super, everything is described in detail, although I have a different brand of washing machine. I changed it myself. There were no difficulties.
A bearing fell apart on my typewriter, please tell me what number of bearing and oil seal are needed for the AQUALTIS 05 U typewriter
Everything is fine. The explanation is good!
Respect, the video helped!
Thank you so much, everything worked out, I spent half a day, but I did everything right. Respect to the author.
How to replace a bearing on a top loading machine? A video on this topic would be great!
Master Volodya posted on YouTube a video of replacing bearings for several types of old washing machines, incl. and for Electrolux EWS1021.So, I want to note that the method he proposed for unscrewing the pulley mounting bolt with a chisel and a hammer does not always work. The other day I dealt with such a completely dead car. A feature of fastening the pulley is the use of a bolt with a centering conical head, screwed with a T50 size asterisk wrench on an anaerobic thread lock of medium strength. The value of the unscrewing torque for these gels has a spread of 12 times. In the instance being repaired, a product corresponding to the upper strength value was apparently used, and therefore the “Russian key” in the form of a chisel and hammer did not work, and unscrewing it with an “asterisk” key or, moreover, with a hexagon threatened to completely destroy the mounting bolt. For this reason, heating the shaft shank with a pulley using a portable gas burner to a temperature of 160 degrees was used. Temperature control was carried out by melting a piece of sugar. Upon reaching the required temperature, the bolt was easily unscrewed with an asterisk key. My advice: do not use a chisel and hammer to disassemble such knots, use a civilized warm-up. After unscrewing the fixing bolt, drive the thread on the shank with an M10 * 1.5 tap and do not forget to lubricate the socket walls with an anaerobic thread lock (blue) during assembly. A small tube of it costs about 150 rubles.
Thank you very much for your site and especially Vladimir (on video). We repaired the Samsung P-1243 machine on our own following your recommendations. Everything worked out. s’saved a ton of money.. Thank you so much again!!!! Respect and respect for people like you!!!!
Hello! On the Samsung, a large bearing crumbled.Tell me how to pull the outer ring of the bearing out of the drum!
The article is good, it came in handy when removing plastic. Only here, on my Indesita, the front panel is contact welded, so I had to swear a lot and remove the drum through the top along with the lower counterweight. Accordingly, install the same way back. How I pulled the elastic back onto the drum is another story altogether! But now everything is working again, the wife walks happy, she is overjoyed!
Do all washing machines have drums that can be taken apart, or are there glued ones?
Good afternoon! Yes, the video is just class! I wanted to ask such a question, I have a washing machine LG F12A8HDS And my bearings are very noisy, please tell me which repair kit of bearings and stuffing box is needed there, thank you very much!
I can't remove the second bearing
Thank you very much for the detailed video!
I'm not a mechanic ... a signalman ... but after watching the video () () I just went nuts ... it seems that Uncle Ashot taught this master in the garage ...
1 how can you knock out bearings in this way ?, but have you tried to use pullers?
2 sitting on his knees is the master?
3 on a tiled floor disassembles ..)))
4 strips of chipboard are called planks)))
5 crimping bearings is the same procedure as knocking out))), any more or less competent master will place a copper plate on the surface, the width of the bearing ...))
6 the only correct solution is how to pressurize the stuffing box ..here (+)
This is an educational program for woodpeckers on a pine tree.))) Please, no offense, this is my (.) view.
Hello. Please tell me for what reason the machine can knock during the spin cycle?
Thanks a lot.Your guide helped me a lot when replacing the bearing. Everything went fine
This method is not entirely correct.By hammering the bearing in this way, you will hit the bearing protection casing by 99 percent. And the photo shows how the miracle master blocked the entrance of the pre-chamber with a sealant. In principle, the author of the article is well done, because. increases the number of potential customers for repair shops.
The Vestel machine went over everything. There is a slight difference, but in principle everything is the same. Thanks for the video. "Stepan Garage" - bearings clog if there is no press.
Nobody faced this? Bosch WAE 20443 washing machine. Oil seal 37.4 62 10 12 CFW (Indian judging by the inscription) was installed by a service center under warranty. Leaked again after warranty expired. I decided to change everything on my own. So, the stuffing box installed by SC has a real diameter of 62.30. The SKF bought to replace it has an honest diameter of 62.00 and, accordingly, dangles in the seat. Of course, there can be no question of any isolation from water.
The only thing that comes to mind is to put it on silicone, but this is some kind of perversion ... What should I do? Change tank? Then it's easier to buy a new washer
And whose cant is this? SC who did the repair? Or Bosch?
If there were fewer such articles, there would be more work for the masters. But with such a masterful approach as in this article, the machine will not last long.
The article is interesting, but for driving the bearings into the drum, I would pull the author's hands out and say that it was so. After such installations, they may be enough for the warranty period. Bearings must be pressed in and abutted against the outer race of the p-ka and upset without distortions,
Thank you very much, great!